Display Camera Feed on GIGA Display Shield with OpenMV
Learn how to connect a OV7675 camera module and send the frames directly to the display, using the OpenMV platform.
The GIGA Display Shield has a camera connector which is extended from the GIGA R1 WiFi board. The inexpensive 20 pin OV7675 camera module can be directly mounted without any other circuitry, and using the OpenMV platform, we can directly display the camera feed on the display, at a framerate of about 15~ FPS.
In this guide, you will learn how to set up your OV7675 camera module with the GIGA R1 WiFi / GIGA Display Shield, using the OpenMV platform.
Note that the OpenMV IDE includes the firmware and the script for this guide. There is no need for any other external tools.
Hardware & Software Needed
- Arduino GIGA R1 WiFi
- Arduino GIGA Display Shield
- OV7675 camera module
- OpenMV (
and above).v4.1.1
Hardware Setup
- Mount the GIGA Display Shield on the back side of the GIGA R1 WiFi.
- Mount the OV7675 camera module to the camera connector just above long side of the display.
OpenMV Setup
The OpenMV IDE includes all tools necessary for flashing your board with the right firmware, as well as the script needed to run the application.
- Download and install the OpenMV IDE.
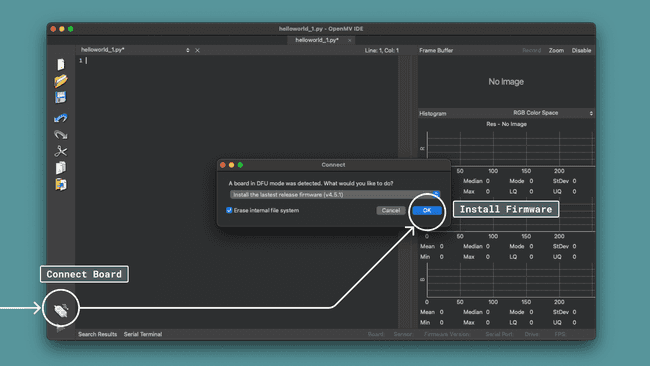
- Launch the editor, and connect your board to your computer. In the bottom left corner of the editor, click the "Connect" button. The editor should detect your board, and prompt you to install the latest firmware available.

Install the firmware - Run the installation, but be aware that this will erase any existing sketch on your board. Wait until it is finished (do not disconnect the board). This can take up to a minute. Note that when installing the OpenMV firmware, your GIGA R1 WiFi board will no longer be detected in the Arduino IDE. To go back to "Arduino mode", simply double tap the reset button on the board, and it will be recognized.
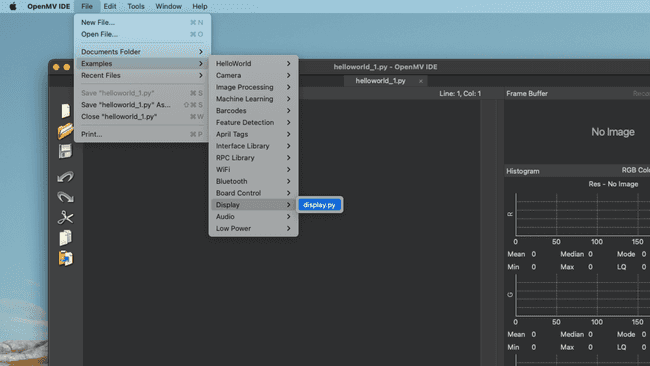
- Once complete, you will need to run a script to see the camera feed. In the OpenMV IDE, navigate to File > Examples > Display > display.py.

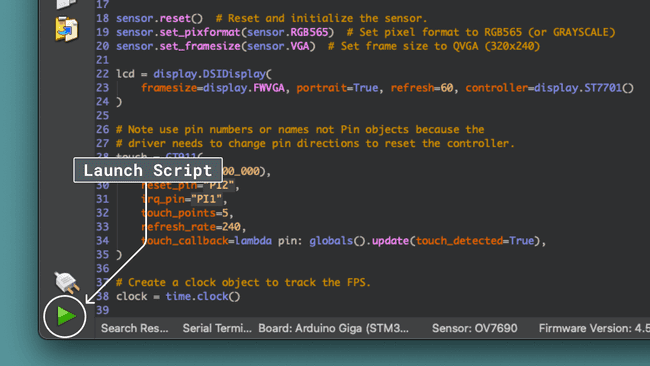
Choose the display.py example. - Click the "Play" button to launch the script. You should now see the camera feed on the GIGA Display Shield.

Click "Play" button to launch script.
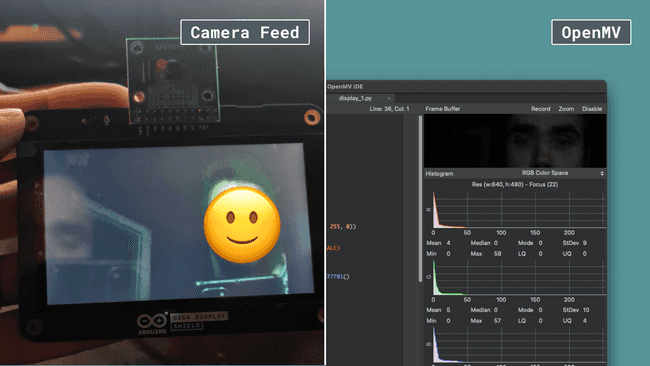
Congratulations, you have now set up GIGA R1 WiFi board to stream camera sensor data to the GIGA Display Shield!
The image below demonstrates how the setup should look like when complete.

Code Example
The full script for this guide can be copied from below:
1
Suggest changes
The content on docs.arduino.cc is facilitated through a public GitHub repository. If you see anything wrong, you can edit this page here.
License
The Arduino documentation is licensed under the Creative Commons Attribution-Share Alike 4.0 license.