GIGA Display Shield Automatic Screen Orientation with IMU
Learn how to use the GIGA Display Shield's IMU to determine the shield's orientation.
Any modern device with a screen uses sensors to determine the correct orientation in which an image should be displayed. Using the Arduino GIGA R1 WiFi with the GIGA Display Shield we can read values given by the onboard IMU to determine what orientation an image should be given. This tutorial will show you how to manipulate an image on the GIGA Display Shield using LVGL and readings from the IMU sensor.
Hardware & Software Needed
Downloading the Library and Board Package
Make sure the latest GIGA Board Package is installed in the Arduino IDE. Tools > Board > Board Manager.... Here you need to look for the Arduino Mbed OS Giga Boards and install it, the Arduino_H7_Video library is included in the Board Package. Now you have to install the library needed for the IMU and the library for handling the image. Go to Tools > Manage libraries.., search for Arduino_BMI270_BMM150, and install it. This library will help us with reading values from the IMU. Now search for LVGL, and install it. This library will be used for the image and rotating it.
Using the IMU Readings With the Image
Now to first get the readings from the IMU we will use the
"Arduino_BMI270_BMM150.h""Arduino_H7_Video.h""lvgl.h"Arduino_H7_Video Display(800, 480, GigaDisplayShield);BoschSensorClass imu(Wire1);1#include "Arduino_BMI270_BMM150.h"2#include "Arduino_H7_Video.h"3#include "lvgl.h"4
5Arduino_H7_Video Display(800, 480, GigaDisplayShield); /* Arduino_H7_Video Display(1024, 768, USBCVideo); */6
7BoschSensorClass imu(Wire1);Start receiving IMU readings with
imu.begin();Display.begin();Then we can assign attributes to the images such as its source, alignment and how the rotation should behave. For more information on image attributes with LVGL, check out our LVGL tutorial.
1LV_IMG_DECLARE(img_arduinologo);2lv_obj_t * img;3
4void setup() {5 Serial.begin(115200);6 7 Display.begin();8 imu.begin();9
10 img = lv_img_create(lv_scr_act());11 lv_img_set_src(img, &img_arduinologo);12 lv_obj_align(img, LV_ALIGN_CENTER, 0, 0);13 lv_img_set_pivot(img, (img_arduinologo.header.w)/2, (img_arduinologo.header.h)/2); /* Rotate around the center of the image */14}Now all that is left is to change the image depending on the IMU readings. First, declare the variables that will hold the values. Then to assign them the IMU reading values use
imu.readAcceleration(x, y, z);Next, we use
if ()lv_img_set_angle(img, rot_angle);1uint8_t rotation = 0;2
3void loop() {4 float x, y, z;5 if (imu.accelerationAvailable()) {6 imu.readAcceleration(x, y, z);7 if ( z < 0.8 && z > -0.8) {8 if (x < -0.8) {9 rotation = 0;10 } else if (x > 0.8) {11 rotation = 2;12 } else if (y < -0.8) {13 rotation = 1;14 } else if (y > 0.8) {15 rotation = 3;16 }17 int16_t rot_angle = 900 - atan(x / y) * 180.0 / M_PI * 10; //Calculation for the rotation angle18 lv_img_set_angle(img, rot_angle);19 }20 }21 lv_timer_handler();22}IMU Test Sketch
The easiest way to tell what values you are getting depending on the orientation of the device is to use a simple sketch, like the one below that will print the IMU values in the serial monitor. Take note of the values you are getting when you rotate the shield and you can use them in the full sketch.
1#include "Arduino_BMI270_BMM150.h"2
3BoschSensorClass imu(Wire1);4
5void setup(){6 Serial.begin(115200);7 imu.begin();8}9
10void loop(){11 float x, y, z;12 if (imu.accelerationAvailable()) {13 imu.readAcceleration(x, y, z);14 Serial.print(x);15 Serial.print('\t');16 Serial.print(y);17 Serial.print('\t');18 Serial.println(z);19 }20}Full Sketch
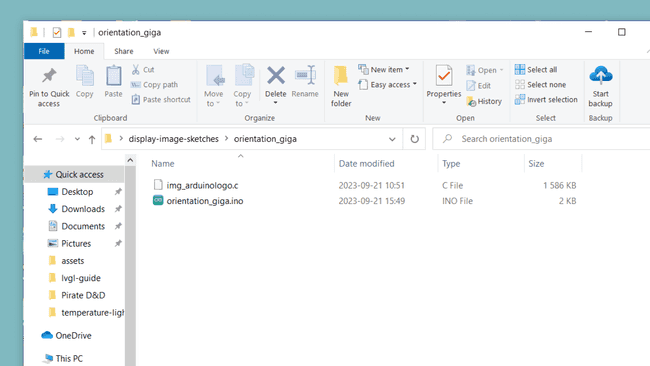
Please note that the image that you want to use with the sketch needs to be in the same folder as the sketch for it to work. It should look like the image below:

Now to put it all together where the image will change depending on how we rotate the board and shield:
1#include "Arduino_BMI270_BMM150.h"2#include "Arduino_H7_Video.h"3#include "lvgl.h"4
5Arduino_H7_Video Display(800, 480, GigaDisplayShield); /* Arduino_H7_Video Display(1024, 768, USBCVideo); */6
7BoschSensorClass imu(Wire1);8
9LV_IMG_DECLARE(img_arduinologo);10lv_obj_t * img;11
12void setup() {13 Serial.begin(115200);14 15 Display.begin();16 imu.begin();17
18 img = lv_img_create(lv_scr_act());19 lv_img_set_src(img, &img_arduinologo);20 lv_obj_align(img, LV_ALIGN_CENTER, 0, 0);21 lv_img_set_pivot(img, (img_arduinologo.header.w)/2, (img_arduinologo.header.h)/2); /* Rotate around the center of the image */22}23
24uint8_t rotation = 0;25
26void loop() {27 float x, y, z;28 if (imu.accelerationAvailable()) {29 imu.readAcceleration(x, y, z);30 if ( z < 0.8 && z > -0.8) {31 if (x < -0.8) {32 rotation = 0;33 } else if (x > 0.8) {34 rotation = 2;35 } else if (y < -0.8) {36 rotation = 1;37 } else if (y > 0.8) {38 rotation = 3;39 }40 int16_t rot_angle = 900 - atan(x / y) * 180.0 / M_PI * 10;41 lv_img_set_angle(img, rot_angle);42 }43 }44 lv_timer_handler();45}Using Another Image
Any image could be used in the sketch. This tutorial and the example uses an image of the Arduino logo. Alternatively, any raw RGB565 image can be used. If you have an image you want to use, you can use this online image converter, or any other software that lets you convert an image to a raw RGB565 image. This website will output in the Binary RGB565 format. For further instructions on how to display your own image, have a look at our Text and Image tutorial.
Testing It Out
Now try rotating your device to see if the image behaves correctly. If the image does not rotate correctly have another look at the values you entered into the previous sketch. It might help to try and run the simple IMU readings printer sketch to take a quick look at the IMU values in the serial monitor. This will help you figure out what values should be considered when the device is being moved.
Conclusion
Now you know how to use the GIGA Display Shield's IMU sensor to gather readings for device orientation, and how to use these readings to make an image on the GIGA Display Shield maintain the correct orientation depending on what way it is facing.
Suggest changes
The content on docs.arduino.cc is facilitated through a public GitHub repository. If you see anything wrong, you can edit this page here.
License
The Arduino documentation is licensed under the Creative Commons Attribution-Share Alike 4.0 license.