Request Sensor Data From Your MKR GSM 1400 via SMS
Learn how to record data from the MKR ENV Shield, and setup an application that allows phones to retrieve data from it via SMS.
Introduction
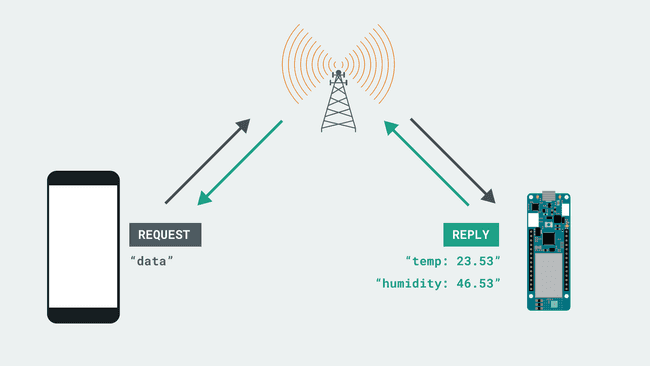
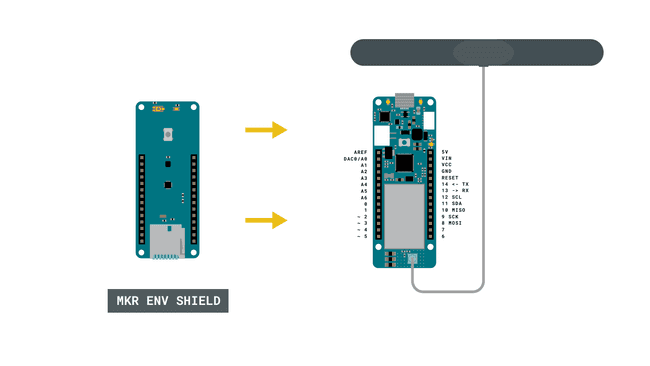
In this tutorial, we will focus on retrieving environmental data over the GSM network, using the MKR GSM 1400 and MKR ENV shield. We will set it up so that when a phone sends an SMS to the board, it will read the sensors on the shield, and reply to the sender with a list of the sensor data inside an SMS.
Goals
The goals of this project are:
- Set up a simple data request over GSM.
- Read the sensors on the MKR ENV shield.
- Listen for incoming texts, and if we get a request, reply with the sensor data to the sender's number.
Hardware & Software Needed
- Arduino IDE (online or offline).
- MKRGSM library installed.
- Arduino MKR GSM 1400.
- MKR ENV shield.
- Antenna.
- SIM card from an operator in your country.
Requesting Data over GSM
Practically speaking, the setup we will create is very basic:
- An SMS containing a specific keyword, which we name
, is sent to the board.data - The board checks if the content of the SMS is equal to
.data - If it is a match, the board reads the sensors on the MKR ENV shield, and replies with a text message to the sender.
- The text message contains sensor data a description of what type of data it is.

The SMS request method is quite practical, easy to setup and as it operates within the GSM, there is almost always coverage, even in more rural parts.
Circuit

Programming the Board
We will now get to the programming part of this tutorial.
1. First, let's make sure we have the drivers installed. If we are using the Web Editor, we do not need to install anything. If we are using an offline editor, we need to install it manually. This can be done by navigating to Tools > Board > Board Manager.... Here we need to look for the Arduino SAMD boards (32-bits Arm® Cortex®-M0+) and install it.
2. Now, we need to install the libraries needed. If we are using the Web Editor, there is no need to install anything. If we are using an offline editor, simply go to Tools > Manage libraries.., and search for MKRGSM and Arduino_MKRENV and install them.
3. We can now take a look at some of the core functions of this sketch:
- base class for all GSM functions.GSM gsmAccess
- base class for all GSM functions for SMS.GSM_SMS sms
- connects to the GSM network with the pin number as a parameter, e.g. 0123.gsmAccess.begin(pin)sms.available()
- retrieves a sender's number.sms.remoteNumber(number, 20)
- function that checks if aequals()
is exactly the same asstring
.string2
- creates an SMS for a specific number.sms.beginSMS(number);
- prints the content of the SMS.sms.print(message);
- sends the SMS.sms.endSMS()
- deletes the message from the modem memory.sms.flush()
- initializes the Arduino_MKRENV library.ENV.begin()
- retrieves sensor data from the MKR ENV shield. Replace readSensor with for example readTemperature.ENV.readSensor()
The sketch can be found in the snippet below. Upload the sketch to the board.
1#include <MKRGSM.h>2#include <Arduino_MKRENV.h>3
4#include "arduino_secrets.h"5// Please enter your sensitive data in the Secret tab or arduino_secrets.h6// PIN Number7const char PINNUMBER[] = "YOUR_PIN";8
9// initialize the library instances10GSM gsmAccess;11GSM_SMS sms;12
13String message;14String data_request = "data"; //used for comparison15
16//variables for sensor data17double temperature;18double humidity;19double pressure;20double uva;21double uvb;22
23// Array to hold the number a SMS is retrieved from24char senderNumber[20];25
26void setup() {27 // initialize serial communications and wait for port to open:28 Serial.begin(9600);29 pinMode(LED_BUILTIN, OUTPUT);30
31 while (!Serial) {32 ; // wait for serial port to connect. Needed for native USB port only33 }34
35 if (!ENV.begin()) {36 Serial.println("Failed to initialize MKR ENV shield!");37 while (1);38 }39
40 Serial.println("SMS environmental data request");41
42 // connection state43 bool connected = false;44
45 // Start GSM connection46 while (!connected) {47 if (gsmAccess.begin(PINNUMBER) == GSM_READY) {48 connected = true;49 } else {50 Serial.println("Not connected");51 delay(1000);52 }53 }54
55 Serial.println("GSM initialized");56 Serial.println("Waiting for messages");57 Serial.println();58}59
60void loop() {61 int c;62
63 // If there are any SMS available()64 if (sms.available()) {65
66 //only read sensors if a request comes in67 temperature = ENV.readTemperature();68 humidity = ENV.readHumidity();69 pressure = ENV.readPressure();70 uva = ENV.readUVA();71 uvb = ENV.readUVB();72
73 Serial.println("Request from:");74
75 // Get remote number76 sms.remoteNumber(senderNumber, 20);77 Serial.println(senderNumber);78
79 Serial.print("Message: ");80 // Read message bytes and print them81 while ((c = sms.read()) != -1) {82 Serial.print((char)c);83
84 //print incoming message to the "message" string85 message += (char)c;86 }87
88 //print empty line to separate incoming message from LED status message89 Serial.println();90
91 //if incoming message is exactly "ON", turn on LED92 if (message.equals(data_request)) {93
94 Serial.println("Data has been requested.");95 Serial.println();96
97
98 //begin constructing an SMS containing sensor data99 sms.beginSMS(senderNumber);100 sms.print("temp: ");101 sms.print(temperature);102 sms.print(", humidity: ");103 sms.print(humidity);104 sms.print(", pressure: ");105 sms.print(pressure);106 sms.print(", uva: ");107 sms.print(uva);108 sms.print(", uvb: ");109 sms.print(uvb);110
111 //send the SMS112 sms.endSMS();113
114 //print the data in the Serial Monitor115 Serial.print("temp: ");116 Serial.println(temperature);117 Serial.print("humidity: ");118 Serial.println(humidity);119 Serial.print("pressure: ");120 Serial.println(pressure);121 Serial.print("uva: ");122 Serial.println(uva);123 Serial.print("uvb: ");124 Serial.println(uvb);125 Serial.println();126
127 Serial.print("Above environmental data sent to: ");128 Serial.println(senderNumber);129 }130
131 Serial.println("\nEND OF MESSAGE");132
133 // Delete message from modem memory134 sms.flush();135
136 // Clear message string137 message = "";138 Serial.println("MESSAGE DELETED");139 Serial.println();140 }141
142 delay(1000);143
144}Testing It Out
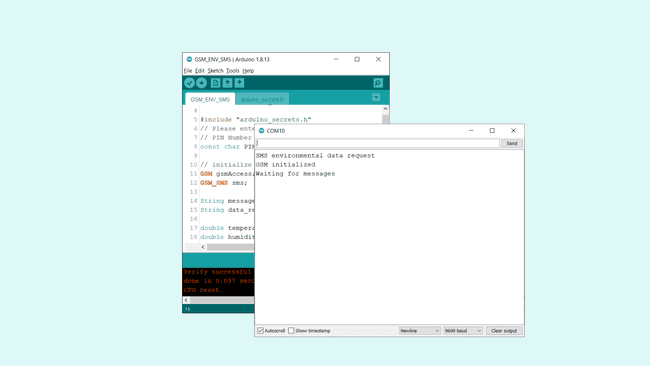
After we have successfully uploaded the code to the board, open the Serial Monitor. We should now see the text
"SMS environmental data request""Waiting for messages"
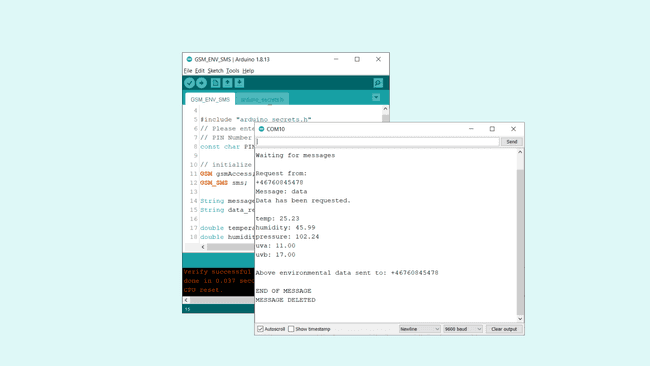
Now we need to create a new SMS that only contains the phrase
dataequal()If the incoming message is exactly
data
We should now get a reply on the phone that we sent the request from, which lists the sensor data!
Troubleshoot
If the code is not working, there are some common issues we can troubleshoot:
- We have not installed the MKRGSM library.
- We have entered the wrong pin number.
- We are out of coverage (no signal).
- We have tried to send a request to the wrong number.
- SIM card may not be activated.
- The request is not properly made. Remember that we need to send
. If we senddata
orData
, it will not work.DATA
Conclusion
In this tutorial, we have created a very basic setup for requesting environmental data, using the MKR GSM 1400 board and the MKR ENV shield. The request, using the GSM_SMS class, simply allows anyone on a phone to send the phrase
dataFeel free to explore the MKRGSM library further, and try out some of the many cool functions in this library.
Suggest changes
The content on docs.arduino.cc is facilitated through a public GitHub repository. If you see anything wrong, you can edit this page here.
License
The Arduino documentation is licensed under the Creative Commons Attribution-Share Alike 4.0 license.