EsploraJoystickMouse
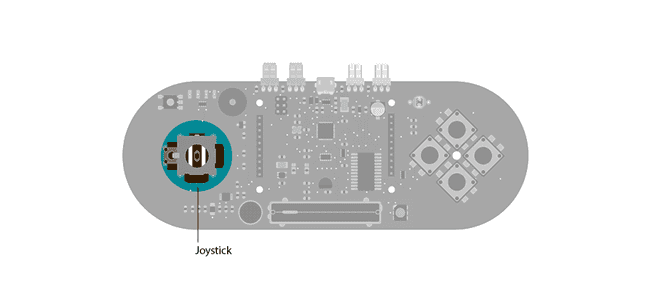
Use the joystick on the Esplora to control the cursor on your computer.
Esplora Joystick Mouse
This sketch shows you how to read information from the Esplora's joystick and use it to control the movement of the cursor on your computer. You're making your Esplora into a mouse!
This sketch will take over the mouse movement of your computer. If you lose control of your cursor do the following :
unplug the Esplora
open the EsploraBlink sketch in the Arduino software
hold the Esplora's reset button down while plugging it back in to your computer
while continuing to hold the reset button, click "Upload" in the Arduino software
when you see the message "Done compiling" in the Arduino IDE, release the reset button
This will stop your Esplora from controlling your cursor while you upload a sketch that doesn't take control of the mouse.
Hardware Required
- Arduino Esplora
Circuit
Only your Arduino Esplora is needed for this example. Connect the Esplora to your computer with a USB cable and open the Arduino's Serial Monitor.

Code
To send data to your computer, you need to open a serial connection. Use Serial.begin() to open a serial port at 9600 baud on the Esplora.
To start communication as a mouse, call Mouse.begin(). This makes the Esplora appear as a mouse to your computer.
To read the position of the joystick, call Esplora.readJoystickX() and Esplora.readJoystickY(), saving the values in variables. This gives you values between -512 and 512 for each axis. When the joystick is centered, the X and Y axes will report 0.
The joystick also acts as a switch when pressed. To read the button, call Esplora.readJoystickSwitch(). This will give you a value of 1 when pressed, and 0 when it is not.
To send the values to the Serial Monitor, you call Serial.print(). When the Esplora is connected, and the Serial Monitor is open, you should start to see values reported like this :
Joystick X: 0 Joystick Y: 0 Button: 0To get numbers appropriate for moving the mouse, use the map() function to scale the joystick values, saving these numbers into new variables.
To actually move the cursor, call Mouse.move(). It takes three arguments, the numbers represent the amount of movement on the x-axis, the y-axis, and the mouse wheel. This example only moves the mouse around on the x and y axes, use the new mapped numbers to move the cursor.
When you attach the Esplora, press Shift-Command-M in the Arduino software to open the serial monitor. As you move the joystick, you'll see the values in the serial monitor as the cursor moves around the screen.
1/*2
3 Esplora Joystick Mouse4
5 This sketch shows you how to read the joystick and use it to control the movement6
7 of the cursor on your computer. You're making your Esplora into a mouse!8
9 WARNING: this sketch will take over your mouse movement. If you lose control10
11 of your mouse do the following:12
13 1) unplug the Esplora.14
15 2) open the EsploraBlink sketch16
17 3) hold the reset button down while plugging your Esplora back in18
19 4) while holding reset, click "Upload"20
21 5) when you see the message "Done compiling", release the reset button.22
23 This will stop your Esplora from controlling your mouse while you upload a sketch24
25 that doesn't take control of the mouse.26
27 Created on 22 Dec 201228
29 by Tom Igoe30
31 Updated 8 March 201432
33 by Scott Fitzgerald34
35 http://www.arduino.cc/en/Reference/EsploraReadJoystickSwitch36
37 This example is in the public domain.38
39 */40
41#include <Esplora.h>42
43void setup() {44
45 Serial.begin(9600); // initialize serial communication with your computer46
47 Mouse.begin(); // take control of the mouse48}49
50void loop() {51
52 int xValue = Esplora.readJoystickX(); // read the joystick's X position53
54 int yValue = Esplora.readJoystickY(); // read the joystick's Y position55
56 int button = Esplora.readJoystickSwitch(); // read the joystick pushbutton57
58 Serial.print("Joystick X: "); // print a label for the X value59
60 Serial.print(xValue); // print the X value61
62 Serial.print("\tY: "); // print a tab character and a label for the Y value63
64 Serial.print(yValue); // print the Y value65
66 Serial.print("\tButton: "); // print a tab character and a label for the button67
68 Serial.print(button); // print the button value69
70 int mouseX = map(xValue, -512, 512, 10, -10); // map the X value to a range of movement for the mouse X71
72 int mouseY = map(yValue, -512, 512, -10, 10); // map the Y value to a range of movement for the mouse Y73
74 Mouse.move(mouseX, mouseY, 0); // move the mouse75
76 if (button == 0) { // if the joystick button is pressed77
78 Mouse.press(); // send a mouse click79
80 } else {81
82 Mouse.release(); // if it's not pressed, release the mouse button83
84 }85
86 delay(10); // a short delay before moving again87}Suggest changes
The content on docs.arduino.cc is facilitated through a public GitHub repository. If you see anything wrong, you can edit this page here.
License
The Arduino documentation is licensed under the Creative Commons Attribution-Share Alike 4.0 license.