Sensors Readings on a Local Webserver
This tutorial teaches you how to set up the Nicla Sense ME and your computer to use the already built tool to get data and configure the board using a CLI app.
Overview
It is possible to configure the Nicla Sense ME to communicate via Serial over USB or Bluetooth® Low Energy using a tool called bhy-controller. This is a CLI tool that can configure the sensors, get their readings and provide this information via a local webserver or display it in the command line interface.
Goals
- How to install Go Lang
- How to set up the Nicla Sense ME
- How to use the bhy-controller tool to: configure and read the sensors through the terminal (CLI commands)
- How to use the bhy-controller tool to: run the webserver, configure and read the sensors on your internet browser
Required Hardware and Software
- Nicla Sense ME
- Nicla Sense ME library (Arduino_BHY2)
- Micro USB-A cable (USB-A to Micro USB-A)
- Arduino IDE 1.8.10+ or Arduino Pro IDE 0.0.4+
- Go Lang
- BHY-CONTROLLER tool
- MKR Board (Only required for DFU)
The bhy-controller tool can be downloaded from https://github.com/arduino/nicla-sense-me-fw, while the libraries can be obtained via library manager in the Arduino IDE / CLI.
Instructions
Building the Bhy-Controller Tool Manually
Bhy-Controller is a tool which allows you to configure the Nicla Sense ME sensors through the terminal console and read their values. You will use the "Go" compiler to create the bhy-controller CLI tool.
First, please go to Go's download page and follow the instructions depending on your OS. Then check that you have "go" in your environment variable PATH.You need the bhy-controller folder for the next step, it can be found here. Remember where you extract this folder, you will need to navigate to it in the next step. Now open a terminal console and open the directory tools/bhy-controller/src and type
go build bhy.goSet up the Board
First, you need to download the library Arduino_BHY2 in the Arduino IDE. Next, you need to upload the App.ino example sketch inside the library. This sketch can be found in: Examples > Arduino_BHY2 > App.ino. Select the sketch and upload it to your board.
Use the Bhy-Controller
Open your terminal console and open the directory tools/bhy-controller/src where you already built the bhy program tool(bhy.exe on windows).
Now, to use the tool, the basic syntax is introducing the name of the program,
bhyOnce the board is set up and connected, you can verify it by using the command:
1bhy listWhere
bhylistRunning the Web App
When you run the Web application, you are going to connect through Bluetooth® to the Nicla Sense ME and you will configure the sensors inside the browser. This application is going to use WebBLE from your browser.
For this feature to work, make sure that WebBLE is both supported and enabled! In Google Chrome go to chrome://flags and enable "Experimental Web Platform features". Check the browser list to confirm that your browser has this feature.
So let's run the app by going to the directory of the bhy-controller app and enter the next command:
1bhy webserverThis will start a local server hosted at localhost:8000
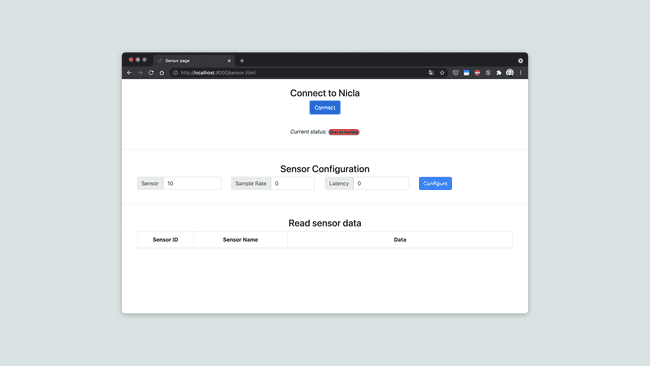
Click the button "Open sensor page" and you will see:

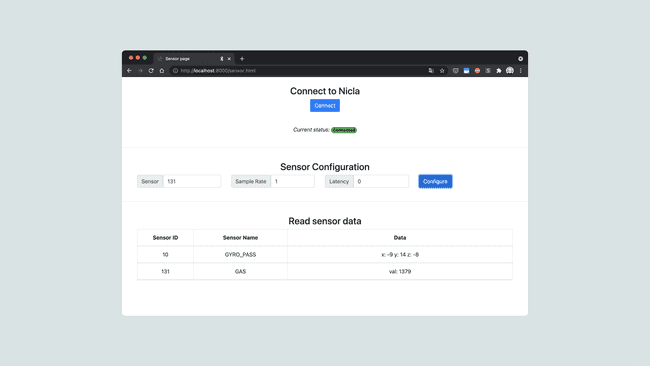
To pair your Nicla Sense ME, first make sure you have uploaded the App.ino from the examples. Then click on the connect button; if the WebBLE is configured, a window will open that will ask you to allow/block the access to Bluetooth®. Now select the Nicla Sense ME device on the list; if the connection succeeded, the current status will change to connected and it will turn green.
Now you need to configure the sensors you want to get data from. Check the Nicla Sense ME Cheat sheet sensor IDs for the ID number of the desired sensor.
To configure the sensor and get the data, enter the sensor ID, e.g Gyroscope is #10. Entering a sample rate that is greater than 0 will enable the sensor. Now press the configure button, it will be visible in the table below, as shown in the image.

Configure a Sensor with CLI Commands
Enable
You can set the rate and the latency of each sensor, please check the Nicla Sense ME Cheat sheet sensor IDs to configure the right one.
The syntax for configuring a sensor is:
1bhy sensor config -p <YourCOMPort> -sensor <SENSORID> -rate <RATE> -latency <LATENCY>For example, if you want to configure the Gyroscope passthrough which has the sensor ID #10 connected on the port
COM011bhy sensor config -p /dev/ttyACM2 -sensor 10 -rate 1 -latency 0Now it is configured to output the reading every second (1Hz).
Disable
If you set the latency and rate to 0, the sensor will be disabled and it will not output any data.
1bhy sensor config -p <YourCOMPort> -sensor <SENSORID> -rate 0 -latency 0Read Data From a Sensor
If you want to read data from a sensor and print it once, you can use:
1bhy sensor read -p <YourCOMPort>To do it continuously, you can add the parameter
-live1bhy sensor read -live -p <YourCOMPort>Using a Passthrough Board with CLI
When you have a firmware for the BHI module or a sketch for the MCU already compiled in a .bin file, you can upload them through a MKR or Portenta board directly using the terminal. You need to upload a passthrough sketch to the MKR or Portenta board, allowing the Nicla to communicate with the computer through the host board. The sketch can be found at Examples > Arduino_BHY_HOST > Passthrough.ino.
You then need to connect the Nicla board to the desired passthrough board either with an Eslov cable or you can mount the Nicla onto the board as a shield. If you wish to mount the Nicla as a shield, take a look at this tutorial. Now that you have everything set up, you can use the commands below to upload the firmware or a sketch if they are in the right format.
Upload a Sketch
Syntax for uploading a sketch:
1bhy dfu -t nicla -bin <CompiledSketch.bin> -p <MKRBoardCOMPort>Updating the Firmware
Syntax for uploading the firmware:
1bhy dfu -t bhi -bin <CompiledFirmware.bin> -p <MKRBoardCOMPort>Conclusion
This tutorial shows how to set up the board to communicate with both the Web Application and the CLI.
You also learned the commands to configure and get data from the board with the Web Application and the CLI. You also went through how to launch the Web Application from your terminal.
Suggest changes
The content on docs.arduino.cc is facilitated through a public GitHub repository. If you see anything wrong, you can edit this page here.
License
The Arduino documentation is licensed under the Creative Commons Attribution-Share Alike 4.0 license.