Host a Web Server on the MKR 1000 WiFi
Learn how to access your board through a browser on the same Wi-Fi network.
Introduction
In this tutorial, we will use the MKR 1000 WiFi board to set up a simple web server, using the WiFi101 library. The web server will be used as an interface for our board, where we will create two buttons to remotely turn ON or OFF an LED.
This tutorial is a great starting point for any maker interested in making applications connected to the Internet.
Hardware & Software Needed
- Arduino IDE (online or offline).
- WiFi101 library.
- Arduino MKR 1000 WiFi (link to store).
- Generic LED
- 82 ohm resistor
- Breadboard
- Jumper wires
Circuit
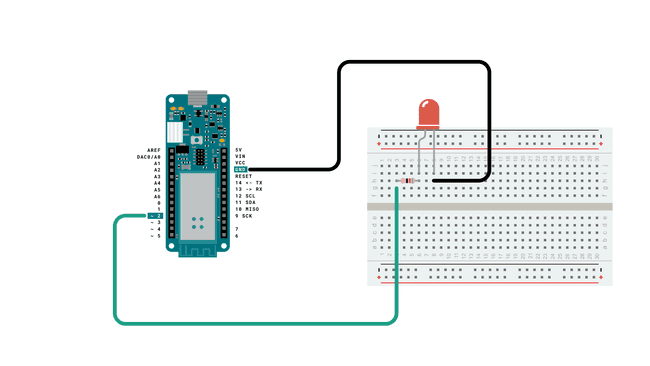
Follow the wiring diagram below to connect the LED to the MKR 1000 WiFi board.

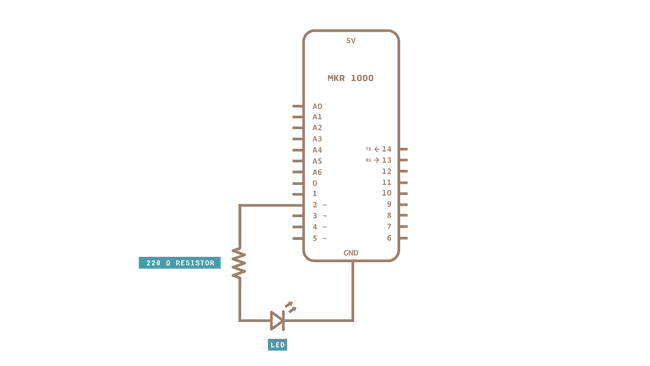
Schematic
This is the schematic of our circuit.

Let's Start
This tutorial barely uses any external hardware, except an LED that we will control remotely. However, the most interesting aspect lies in the library we are going to use: WiFi101. This library can be used for many different connectivity projects, where it allows us to connect to WiFi, make GET requests and - as we will explore in this tutorial - to create a web server.
First, let's make sure we have the drivers installed. If we are using the Web Editor, we do not need to install anything. If we are using an offline editor, we need to install it manually. This can be done by navigating to Tools > Board > Board Manager.... Here we need to look for the Arduino SAMD boards (32-bits Arm® Cortex®-M0+) and install it.
Now, we need to install the library needed. If we are using the Web Editor, there is no need to install anything. If we are using an offline editor, simply go to Tools > Manage libraries.., and search for WiFi101 and install it.
We can now take a look at some of the core functions of this sketch:
- stores network name.char ssid[] = ""
- stores network password.char pass[] = ""
connects to Wi-Fi with credentials.WiFi.begin(ssid, pass)
- creates a server that listens for incoming connections on the specified port.WiFiServer server(80)
- creates a client that can connect to to a specified internet IP address.WiFiClient client
- tells the server to begin listening for incoming connections.server.begin()
- checks for connected clients.client.connected
- checks for available data.client.available
- reads the available data.client.read
- print something to the client (e.g. html code).client.print()
- closes the connection.client.stop()
The sketch can be found in the snippet below. It is very similar to the sketch found in File > Examples > WiFi101 > SimpleWebServer, with only minor modifications.
Upload the code to the board, and make sure the right board and port are selected.
1#include <SPI.h>2#include <WiFi101.h>3
4char ssid[] = ""; // your network SSID (name) between the " "5char pass[] = ""; // your network password between the " "6int keyIndex = 0; // your network key Index number (needed only for WEP)7int status = WL_IDLE_STATUS; //connection status8WiFiServer server(80); //server socket9
10WiFiClient client = server.available();11
12int ledPin = 2;13
14void setup() {15 Serial.begin(9600);16 pinMode(ledPin, OUTPUT);17 while (!Serial);18
19 enable_WiFi();20 connect_WiFi();21
22 server.begin();23 printWifiStatus();24}25
26void loop() {27 client = server.available();28
29 if (client) {30 printWEB();31 }32}33
34void printWifiStatus() {35 // print the SSID of the network you're attached to:36 Serial.print("SSID: ");37 Serial.println(WiFi.SSID());38
39 // print your board's IP address:40 IPAddress ip = WiFi.localIP();41 Serial.print("IP Address: ");42 Serial.println(ip);43
44 // print the received signal strength:45 long rssi = WiFi.RSSI();46 Serial.print("signal strength (RSSI):");47 Serial.print(rssi);48 Serial.println(" dBm");49
50 Serial.print("To see this page in action, open a browser to http://");51 Serial.println(ip);52}53
54void enable_WiFi() {55
56 String fv = WiFi.firmwareVersion();57 if (fv < "1.0.0") {58 Serial.println("Please upgrade the firmware");59 }60}61
62void connect_WiFi() {63 // attempt to connect to Wifi network:64 while (status != WL_CONNECTED) {65 Serial.print("Attempting to connect to SSID: ");66 Serial.println(ssid);67 // Connect to WPA/WPA2 network. Change this line if using open or WEP network:68 status = WiFi.begin(ssid, pass);69
70 // wait 10 seconds for connection:71 delay(10000);72 }73}74
75void printWEB() {76
77 if (client) { // if you get a client,78 Serial.println("new client"); // print a message out the serial port79 String currentLine = ""; // make a String to hold incoming data from the client80 while (client.connected()) { // loop while the client's connected81 if (client.available()) { // if there's bytes to read from the client,82 char c = client.read(); // read a byte, then83 Serial.write(c); // print it out the serial monitor84 if (c == '\n') { // if the byte is a newline character85
86 // if the current line is blank, you got two newline characters in a row.87 // that's the end of the client HTTP request, so send a response:88 if (currentLine.length() == 0) {89
90 // HTTP headers always start with a response code (e.g. HTTP/1.1 200 OK)91 // and a content-type so the client knows what's coming, then a blank line:92 client.println("HTTP/1.1 200 OK");93 client.println("Content-type:text/html");94 client.println();95
96 //create the buttons97 client.print("Click <a href=\"/H\">here</a> turn the LED on<br>");98 client.print("Click <a href=\"/L\">here</a> turn the LED off<br><br>");99
100 int randomReading = analogRead(A1);101 client.print("Random reading from analog pin: ");102 client.print(randomReading);103
104
105
106
107 // The HTTP response ends with another blank line:108 client.println();109 // break out of the while loop:110 break;111 }112 else { // if you got a newline, then clear currentLine:113 currentLine = "";114 }115 }116 else if (c != '\r') { // if you got anything else but a carriage return character,117 currentLine += c; // add it to the end of the currentLine118 }119
120 if (currentLine.endsWith("GET /H")) {121 digitalWrite(ledPin, HIGH);122 }123 if (currentLine.endsWith("GET /L")) {124 digitalWrite(ledPin, LOW);125 }126
127 }128 }129 // close the connection:130 client.stop();131 Serial.println("client disconnected");132 }133}Testing It Out
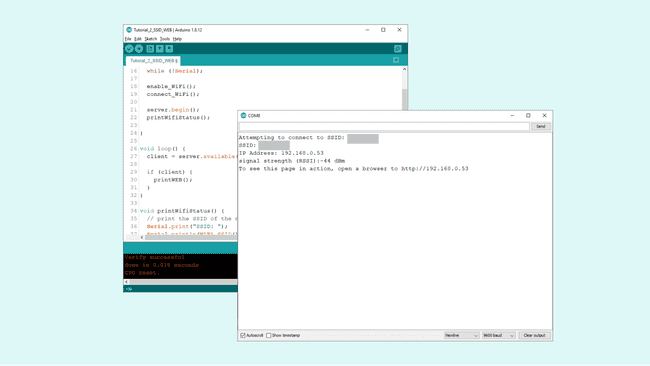
Once we have successfully uploaded the code to the board, open the Serial Monitor and it should look like the following image:

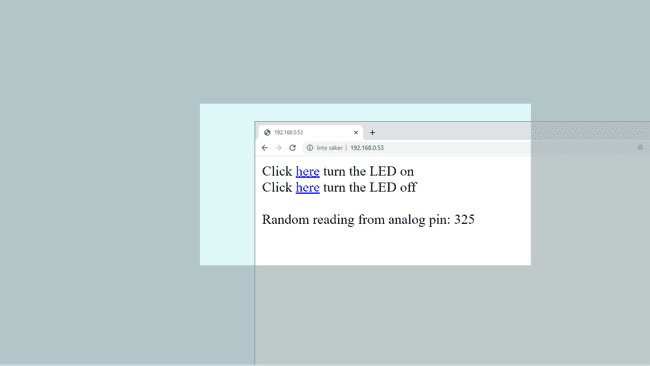
Copy the IP address and enter it in a browser. Now, we should see a very empty page with two links at the top left that says "Click here to turn the LED on" and "Click here to turn the LED off".

When interacting with the links, you should see the LED, connected to pin 2, turn on and off depending on what you click. Now we have successfully created a way of interacting with our MKR 1000 WiFi board remotely.
Troubleshoot
If the code is not working, there are some common issues we might need to troubleshoot:
- We have not updated the latest firmware for the board.
- We have not installed the Board Package required for the board.
- We have not installed the WiFi101 library.
- We have entered the SSID and PASS incorrectly: remember, it is case sensitive.
- We have not selected the right port to upload: depending on what computer we use, sometimes the board is duplicated. By simply restarting the editor, this issue can be solved.
Conclusion
In this tutorial, we learned how to create a basic web interface from scratch. We learned how to control an LED remotely, and how to display the value of an analog pin in the browser as well. Using this example, we can build much more complex projects, and if you are familiar with both HTML and CSS, you can create some really cool looking interfaces! If you are new to HTML and CSS, there are plenty of online guides that can guide you, you can visit w3schools or codecademy for many tips and tricks.
Tip: Check out fontawesome to get access to thousands of free icons that you can customize your local web server with!
Suggest changes
The content on docs.arduino.cc is facilitated through a public GitHub repository. If you see anything wrong, you can edit this page here.
License
The Arduino documentation is licensed under the Creative Commons Attribution-Share Alike 4.0 license.