Getting Started with Arduino WiFi Shield 101
The first steps to setting up the Arduino WiFi Shield 101
This is a retired product.
The Arduino WiFi 101 shield allows an Arduino board to connect to the internet using the WiFi101 library. The WiFi101 library can be downloaded using the Arduino Library Manager. The WiFI101 library is similar to the Ethernet library and many of the function calls are the same.
Connecting the Shield

To use the shield, mount it on top of an Arduino board (e.g. the Zero). To upload sketches to the board, connect it to your computer with a USB cable as you normally would. Once the sketch has been uploaded, you can disconnect the board from your computer and power it with an external power supply.
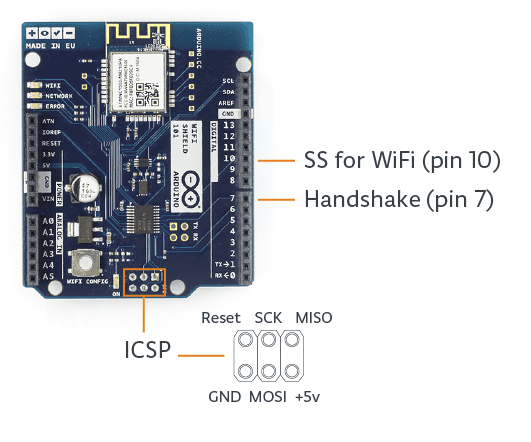
Digital pin 7 is used as a handshake pin between the WiFi shield and the Arduino, and should not be used;
Digital pin6 is attached to the on-board button;
Digital pin5 drives the reset line of the on-board WINC1500 module;
Network Settings
The shield will connect to open networks, as well as those using WEP and WPA2 Personal encryption. The shield will not connect to networks using WPA2 Enterprise encryption.
The SSID (network name) must be broadcast for the shield to connect.
Depending on your wireless router configuration, you need different information.
For an open (unencrypted) network, you need the SSID.
For networks using WPA/WPA2 Personal encryption, you need the SSID and password.
WEP network passwords are hexadecimal strings known as keys. A WEP network can have 4 different keys; each key is assigned a "Key Index" value. For WEP encrypted networks, you need the SSID, the key, and key number.
Scan for available networks
The sketch below is a good one to run the first time you use the board in a new area. This sketch will not connect to a network, but it will show you what networks the shield can view. Your WiFi shield will probably not see as many networks as a computer with a larger WiFi antenna. Once you have downloaded the sketch to your Arduino, open the serial port to see available networks.
1#include <SPI.h>2#include <WiFi101.h>3
4void setup() {5
6 // initialize serial and wait for the port to open:7
8 Serial.begin(9600);9
10 while(!Serial) ;11
12 // attempt to connect using WEP encryption:13
14 Serial.println("Initializing Wifi...");15
16 printMacAddress();17
18 // scan for existing networks:19
20 Serial.println("Scanning available networks...");21
22 listNetworks();23}24
25void loop() {26
27 delay(10000);28
29 // scan for existing networks:30
31 Serial.println("Scanning available networks...");32
33 listNetworks();34}35
36void printMacAddress() {37
38 // the MAC address of your Wifi shield39
40 byte mac[6];41
42 // print your MAC address:43
44 WiFi.macAddress(mac);45
46 Serial.print("MAC: ");47
48 Serial.print(mac[5],HEX);49
50 Serial.print(":");51
52 Serial.print(mac[4],HEX);53
54 Serial.print(":");55
56 Serial.print(mac[3],HEX);57
58 Serial.print(":");59
60 Serial.print(mac[2],HEX);61
62 Serial.print(":");63
64 Serial.print(mac[1],HEX);65
66 Serial.print(":");67
68 Serial.println(mac[0],HEX);69}70
71void listNetworks() {72
73 // scan for nearby networks:74
75 Serial.println("** Scan Networks **");76
77 byte numSsid = WiFi.scanNetworks();78
79 // print the list of networks seen:80
81 Serial.print("number of available networks:");82
83 Serial.println(numSsid);84
85 // print the network number and name for each network found:86
87 for (int thisNet = 0; thisNet<numSsid; thisNet++) {88
89 Serial.print(thisNet);90
91 Serial.print(") ");92
93 Serial.print(WiFi.SSID(thisNet));94
95 Serial.print("\tSignal: ");96
97 Serial.print(WiFi.RSSI(thisNet));98
99 Serial.print(" dBm");100
101 Serial.print("\tEncryption: ");102
103 Serial.println(WiFi.encryptionType(thisNet));104
105 }106}Open network example
The sketch below shows you how to initiate a connection with an open network named "yourNetwork".
1#include <SPI.h>2#include <WiFi101.h>3
4char ssid[] = "yourNetwork"; // the name of your network5int status = WL_IDLE_STATUS; // the Wifi radio's status6
7void setup() {8
9 // initialize serial:10
11 Serial.begin(9600);12
13 // attempt to connect to an open network:14
15 Serial.println("Attempting to connect to open network...");16
17 status = WiFi.begin(ssid);18
19 // if you're not connected, stop here:20
21 if ( status != WL_CONNECTED) {22
23 Serial.println("Couldn't get a wifi connection");24
25 while(true);26
27 }28
29 // if you are connected :30
31 else {32
33 Serial.print("Connected to the network");34
35 }36}37
38void loop() {39
40 // do nothing41}WPA network example
The example below shows how to connect to a WPA/WPA2 Personal encrypted network named "yourNetwork" with a password "12345678".
1#include <SPI.h>2#include <WiFi101.h>3
4char ssid[] = "yourNetwork"; // your network SSID (name)5char pass[] = "12345678"; // your network password6int status = WL_IDLE_STATUS; // the Wifi radio's status7
8void setup() {9
10 // initialize serial:11
12 Serial.begin(9600);13
14 // attempt to connect using WPA2 encryption:15
16 Serial.println("Attempting to connect to WPA network...");17
18 status = WiFi.begin(ssid, pass);19
20 // if you're not connected, stop here:21
22 if ( status != WL_CONNECTED) {23
24 Serial.println("Couldn't get a wifi connection");25
26 while(true);27
28 }29
30 // if you are connected, print out info about the connection:31
32 else {33
34 Serial.println("Connected to network");35
36 }37}38
39void loop() {40
41 // do nothing42}WEP Network example
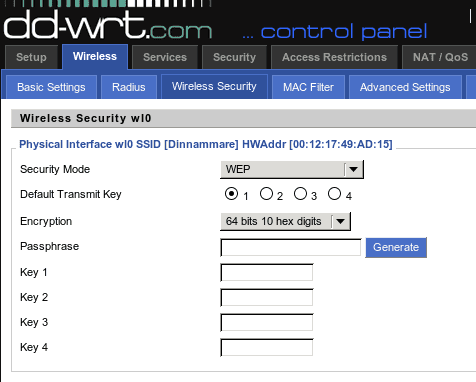
Your router will most likely have a settings dialog similar to the one below for generating the WEP key based on an ASCII passphrase:

If you do not have access to your router's administrative tools, consult your network administrator.
Each key is 10 or 26 hexadecimal digits long (40 or 128 bits) and paired with a key number. For example, a 40-bit key, ABBADEAF01 will work, but ABBADEAF won't work (too short) and ABBAISDEAF won't work (I and S are not hexadecimal characters).vFor 128-bit, you need a string that is 26 characters long. D0D0DEADF00DABBADEAFBEADED will work because it's 26 characters, all in the 0-9, A-F range.
NB : WEP provides a basic encryption mechanism, but it can be cracked. If you require strong encryption for your network, it is recommended you use WPA
The example below shows how to connect to a WEP encrypted network named "yourNetwork" with a hex key of "ABBADEAF01", and a key index of 0.
1#include <SPI.h>2#include <WiFi101.h>3
4char ssid[] = "yourNetwork"; // your network SSID (name)5char key[] = "ABBADEAF01"; // your network key6int keyIndex = 0; //your network key Index number7int status = WL_IDLE_STATUS; // the Wifi radio's status8
9void setup() {10
11 // initialize serial:12
13 Serial.begin(9600);14
15 // attempt to connect using WEP encryption:16
17 Serial.println("Attempting to connect to WEP network...");18
19 status = WiFi.begin(ssid, keyIndex, key);20
21 // if you're not connected, stop here:22
23 if ( status != WL_CONNECTED) {24
25 Serial.println("Couldn't get a wifi connection");26
27 while(true);28
29 }30
31 // if you are connected, print out info about the connection:32
33 else {34
35 Serial.println("Connected to network");36
37 }38}39
40void loop() {41
42 // do nothing43}SPI
Arduino communicates with the shield using the SPI bus. This is on digital pins 11, 12, and 13 on the Uno and pins 50, 51, and 52 on the Mega. On both boards, pin 10 is used as SS. On the Mega, the hardware SS pin, 53, is not used, but it must be kept as an output or the SPI interface won't work.
Upgrading Firmware and uploading SSL certificates
When it is needed, the WiFi101 library is updated to implement new features. This usually requires an update of the WiFi firmware with a specific tool. The shield comes with a number of root certificates that allow the secure connection with a wide variety of websites. If you need to use different certificates, you need to use the same tool. Please refer to the Firmware Updater sketch and plug-in documentation, available from the WiFi101 library page.
Tutorial
Here a list of tutorials that will help you in making very cool things!
Interact with Google Calendar This example shows you how to make requests to Google Calendar using a WiFi shield 101.
Weather audio notifier In this example, weather information from openweathermap.org is used to display the current weather information.
Upload data to Thingspeak Send a live stream of the light and temperature values in your environment using ThingSpeak.com.
Next steps
Refer to the WiFi 101 library page for more information on the functionality of the shield, as well as further examples.
The text of the Arduino getting started guide is licensed under a Creative Commons Attribution-ShareAlike 3.0 License. Code samples in the guide are released into the public domain.
Suggest changes
The content on docs.arduino.cc is facilitated through a public GitHub repository. If you see anything wrong, you can edit this page here.
License
The Arduino documentation is licensed under the Creative Commons Attribution-Share Alike 4.0 license.