Inter-Integrated Circuit (I2C) Protocol
Allows the communication between devices or sensors connected via Two Wire Interface Bus.
Introduction
A good way of adding complexity of features to your projects without adding complexity of wiring, is to make use of the Inter-integrated circuit (I2C) protocol. The I2C protocol is supported on all Arduino boards. It allows you to connect several peripheral devices, such as sensors, displays, motor drivers, and so on, with only a few wires. Giving you lots of flexibility and speeding up your prototyping, without an abundancy of wires. Keep reading to learn about how it works, how it is implemented into different standards, as well as how to use the Wire Library to build your own I2C devices.
Overview
This section provides an overview of the topics covered in the article.
What Is I2C?
The I2C protocol involves using two lines to send and receive data: a serial clock pin (SCL) that the Arduino Controller board pulses at a regular interval, and a serial data pin (SDA) over which data is sent between the two devices.
In I2C, there is one controller device, with one or more peripheral devices connected to the controllers SCL and SDA lines.
As the clock line changes from low to high (known as the rising edge of the clock pulse), a single bit of information is transferred from the board to the I2C device over the SDA line. As the clock line keeps pulsing, more and more bits are sent until a sequence of a 7 or 8 bit address, and a command or data is formed. When this information is sent - bit after bit -, the called upon device executes the request and transmits it's data back - if required - to the board over the same line using the clock signal still generated by the Controller on SCL as timing.
Each device in the I2C bus is functionally independent from the controller, but will respond with information when prompted by the controller.
Because the I2C protocol allows for each enabled device to have it's own unique address, and as both controller and peripheral devices to take turns communicating over a single line, it is possible for your Arduino board to communicate (in turn) with many devices, or other boards, while using just two pins of your microcontroller.
An I2C message on a lower bit-level looks something like this:
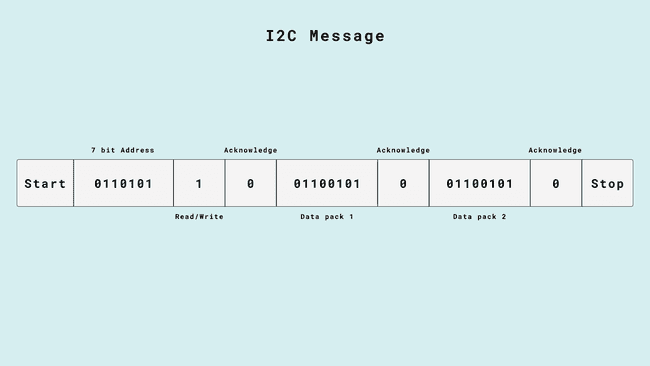
- The controller sends out instructions through the I2C bus on the data pin (SDA), and the instructions are prefaced with the address, so that only the correct device listens.
- Then there is a bit signifying whether the controller wants to read or write.
- Every message needs to be acknowledged, to combat unexpected results, once the receiver has acknowledged the previous information it lets the controller know, so it can move on to the next set of bits.
- 8 bits of data
- Another acknowledgement bit
- 8 bits of data
- Another acknowledgement bit
But how does the controller and peripherals know where the address, messages, and so on starts and ends? That's what the SCL wire is for. It synchronises the clock of the controller with the devices, ensuring that they all move to the next instruction at the same time.
However, you are nearly never going to actually need to consider any of this, in the Arduino ecosystem we have the Wire library that handles everything for you.
Arduino I2C Pins
Below is a table that lists the different board form factors and what pins are for I2C.
| Form factor | SDA | SCL | SDA1 | SCL1 | SDA2 | SCL2 |
|---|---|---|---|---|---|---|
| UNO | SDA/A4 | SCL/A5 | ||||
| Nano | A4 | A5 | ||||
| MKR | D11 | D12 | ||||
| GIGA | D20 | D21 | D102 | D101 | D9 | D8 |
| Mega & Due | D20 | D21 |
I2C Wiring
Below you'll find a couple ways to wire I2C breakout modules. Which way is best depends on each module, and your needs.
Breakout Boards
Some brekout board modules let you wire them directly, with bare wires on a breadboard. To connect a module like this to your Arduino board, connect it as follows:
- VCC* - 5V/3V3 pin (depending on breakout module)
- GND* - GND
- SDA - SDA
- SCL - SCL
*Pin name might vary depending on what module, VCC might be named "VIN", "+", etc. GND might be named "-".
Here's an example of how you might connect a sensor to an UNO R4 WiFi:

Qwiic & STEMMA QT
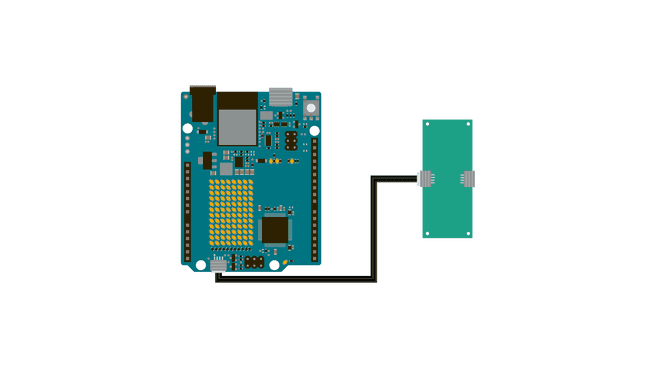
When delving into the market of breakout modules and sensors, you'll find that there are entire ecosystems, where standards are built around the I2C protocol. Examples of such standards are Qwiic, developed by Sparkfun, and STEMMA QT, developed by Adafruit. Both Qwiic and STEMMA QT use a 4-pin JST SH connector for I2C devices, making it easier for third parties to design hardware with vast compatibility. By having a standardized connector, you'll know that if you see the word Qwiic or STEMMA QT in association with an item, that it will work together with an Arduino board with a Qwiic or STEMMA QT connector, such as the UNO R4 WiFi.
Both Qwiic and STEMMA QT bundle together wires for power, ground, as well as the SDA and SCL wires for I2C, making it a complete kit, one cable that bundles everything together.
But what's the difference between the two?
Both Qwiic and STEMMA QT use I2C, and even when inspecting modules using the two standards up close, it may be difficult to tell what makes them unique from each other. But there is a difference! And it has some implications on how and for what you may use them.
Qwiic has level shifting and voltage regulation on the controller (but not on the peripherals). What this means is that Qwiic is 3.3 V logic only. This makes it easier to use, as for the end user, there is one less thing that can go wrong when designing and assembling your circuit.
STEMMA QT, on the other hand, doesn't have this. This lets you use both 3.3 V and 5 V logic for modules. This also means that there is one more thing you may need to consider when creating your circuit, but it also grants some more flexibility in power and logic requirements.
The pin order for STEMMA QT is designed to match the pin order for Qwiic, enabling cross-compatibility between the two standards.
Grove
Grove is another connector standard, this one developed by seeed studio. You can find a plethora of modules with a Grove connector, however only some of them use I2C. There are no Arduino boards that have a built in Grove connector, however you can use products such as the MKR connector carrier, Nano Grove Shield, or the Base Shield from the Arduino Sensor Kit to connect Grove sensors to your Arduino board.
Wire Library
The Wire library is what Arduino uses to communicate with I2C devices. It is included in all board packages, so you don't need to install it manually in order to use it.
To see the full API for the Wire library, visit its documentation page.
- Initialise the I2C busbegin()
- Close the I2C busend()
- Request bytes from a peripheral devicerequestFrom()
- Begins queueing up a transmissionbeginTransmission()
- Transmit the bytes that have been queued and end the transmissionendTransmission()
- Writes data from peripheral to controller or vice versawrite()
- returns the number of bytes available for retrievalavailable()
- Reads a byte that was transmitted from a peripheral to a controller.read()
- Modify the clock frequencysetClock()
- Register a function to be called when a peripheral receives a transmissiononReceive()
- Register a function to be called when a controller requests dataonRequest()
- Sets the timeout for transmissions in controller modesetWireTimeout()
- Clears the timeout flagclearWireTimeoutFlag()
- Checks whether a timeout has occurred since the last time the flag was cleared.getWireTimeoutFlag()
Derived libraries
When you buy basically any breakout module that makes use of the I2C protocol, they will come with some library that helps you use the sensor. This library is more often than not built on top of the Wire library, and uses it under the hood. Adding functionality in order to make, for example, reading temperature easier.
An example of this is if you want to use Adafruits MCP9808 sensor module, you download the Adafruit_MCP9808 Library from the IDEs library manager, which enables you to use functions such as
tempsensor.readTempC()To learn how to install libraries, check out our guide to installing libraries.
Examples
The remainder of this article is a collection of examples that can get you off the ground with I2C.
Controller Reader
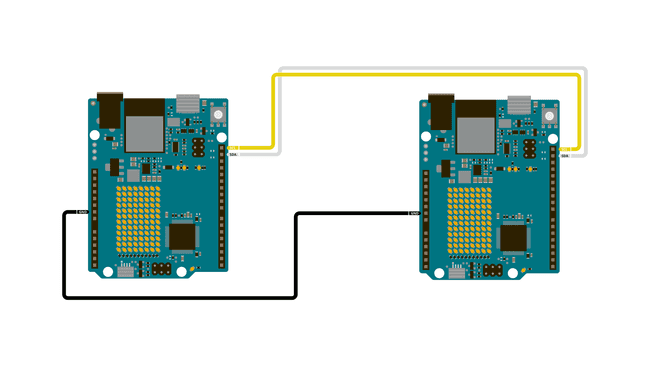
In some situations, it can be helpful to set up two (or more!) Arduino boards to share information with each other. In this example, two boards are programmed to communicate with one another in a Controller Reader/Peripheral Sender configuration via the I2C synchronous serial protocol. Several functions of Arduino's Wire Library are used to accomplish this. Arduino 1, the Controller, is programmed to request, and then read, 6 bytes of data sent from the uniquely addressed Peripheral Arduino. Once that message is received, it can then be viewed in the Arduino Software (IDE) serial monitor window.
Controller Reader Sketch
1// Wire Controller Reader2// by Nicholas Zambetti [http://www.zambetti.com](http://www.zambetti.com)3
4// Demonstrates use of the Wire library5// Reads data from an I2C/TWI peripheral device6// Refer to the "Wire Peripheral Sender" example for use with this7
8// Created 29 March 20069
10// This example code is in the public domain.11
12
13#include <Wire.h>14
15void setup() {16 Wire.begin(); // join i2c bus (address optional for master)17 Serial.begin(9600); // start serial for output18}19
20void loop() {21 Wire.requestFrom(8, 6); // request 6 bytes from peripheral device #822
23 while (Wire.available()) { // peripheral may send less than requested24 char c = Wire.read(); // receive a byte as character25 Serial.print(c); // print the character26 }27
28 delay(500);29}Peripheral Sender Sketch
1// Wire Peripheral Sender2// by Nicholas Zambetti [http://www.zambetti.com](http://www.zambetti.com)3
4// Demonstrates use of the Wire library5// Sends data as an I2C/TWI peripheral device6// Refer to the "Wire Master Reader" example for use with this7
8// Created 29 March 20069
10// This example code is in the public domain.11
12
13#include <Wire.h>14
15void setup() {16 Wire.begin(8); // join i2c bus with address #817 Wire.onRequest(requestEvent); // register event18}19
20void loop() {21 delay(100);22}23
24// function that executes whenever data is requested by master25// this function is registered as an event, see setup()26void requestEvent() {27 Wire.write("hello "); // respond with message of 6 bytes28 // as expected by master29}Controller Writer

In some situations, it can be helpful to set up two (or more!) Arduino boards to share information with each other. In this example, two boards are programmed to communicate with one another in a Controller Writer/Peripheral Receiver configuration via the I2C synchronous serial protocol. Several functions of Arduino's Wire Library are used to accomplish this. Arduino 1, the Controller, is programmed to send 6 bytes of data every half second to a uniquely addressed Peripheral. Once that message is received, it can then be viewed in the Peripheral board's serial monitor window opened on the USB connected computer running the Arduino Software (IDE).
Controller Writer Sketch
1// Wire Master Writer2// by Nicholas Zambetti [http://www.zambetti.com](http://www.zambetti.com)3
4// Demonstrates use of the Wire library5// Writes data to an I2C/TWI Peripheral device6// Refer to the "Wire Peripheral Receiver" example for use with this7
8// Created 29 March 20069
10// This example code is in the public domain.11
12
13#include <Wire.h>14
15void setup()16{17 Wire.begin(); // join i2c bus (address optional for master)18}19
20byte x = 0;21
22void loop()23{24 Wire.beginTransmission(4); // transmit to device #425 Wire.write("x is "); // sends five bytes26 Wire.write(x); // sends one byte27 Wire.endTransmission(); // stop transmitting28
29 x++;30 delay(500);31}Peripheral Receiver Sketch
1// Wire Peripheral Receiver2// by Nicholas Zambetti [http://www.zambetti.com](http://www.zambetti.com)3
4// Demonstrates use of the Wire library5// Receives data as an I2C/TWI Peripheral device6// Refer to the "Wire Master Writer" example for use with this7
8// Created 29 March 20069
10// This example code is in the public domain.11
12
13#include <Wire.h>14
15void setup()16{17 Wire.begin(4); // join i2c bus with address #418 Wire.onReceive(receiveEvent); // register event19 Serial.begin(9600); // start serial for output20}21
22void loop()23{24 delay(100);25}26
27// function that executes whenever data is received from master28// this function is registered as an event, see setup()29void receiveEvent(int howMany)30{31 while(1 < Wire.available()) // loop through all but the last32 {33 char c = Wire.read(); // receive byte as a character34 Serial.print(c); // print the character35 }36 int x = Wire.read(); // receive byte as an integer37 Serial.println(x); // print the integer38}Accelerometer
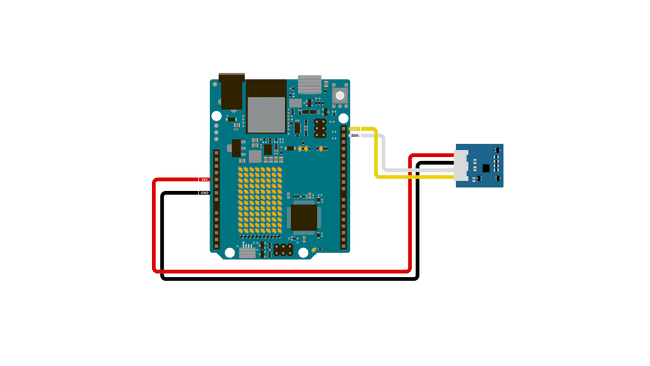
This code lets you read accelerometer data from a Grove 6-Axis Accelerometer module using the seeed arduino LSM6DS3 library.
1#include "LSM6DS3.h"2#include "Wire.h"3
4//Create instance of Accelerometer class5LSM6DS3 accelerometer(I2C_MODE, 0x6A);6
7void setup() {8 // put your setup code here, to run once:9 Serial.begin(9600);10 while (!Serial);11
12 if (accelerometer.begin() != 0) {13 Serial.println("LSM6DS3 not found, check your wiring.");14 } else {15 Serial.println("LSM6DS3 found!");16 }17}18
19void loop() {20 //Gyroscope21 Serial.print("\nGyroscope:\n");22 Serial.print(" X1 = ");23 Serial.println(accelerometer.readFloatGyroX(), 4);24 Serial.print(" Y1 = ");25 Serial.println(accelerometer.readFloatGyroY(), 4);26 Serial.print(" Z1 = ");27 Serial.println(accelerometer.readFloatGyroZ(), 4);28
29 //Accelerometer30 Serial.print("\nAccelerometer:\n");31 Serial.print(" X1 = ");32 Serial.println(accelerometer.readFloatAccelX(), 4);33 Serial.print(" Y1 = ");34 Serial.println(accelerometer.readFloatAccelY(), 4);35 Serial.print(" Z1 = ");36 Serial.println(accelerometer.readFloatAccelZ(), 4);37
38 delay(1000);39}I2C BMP280
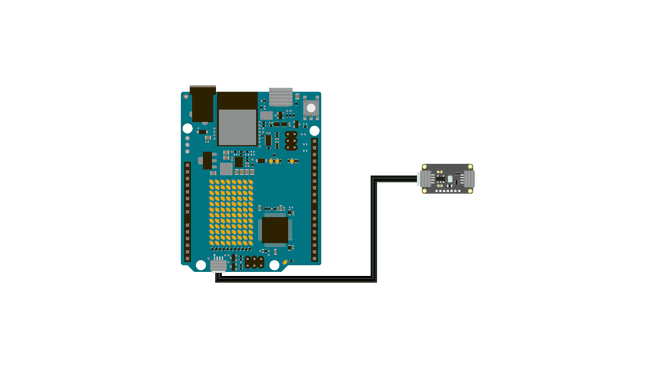
This code example lets you read the temperature over I2C from a BMP280 breakout module from Adafruit:
1#include <Wire.h>2#include <Adafruit_BMP280.h>3
4//Create an instance of the BMP280 sensor5Adafruit_BMP280 bmp;6
7void setup() {8 Serial.begin(9600);9
10 // Start the sensor, and verify that it was found11 if (!bmp.begin()) {12 Serial.println("Sensor not found");13 while (1){}14 }15
16}17
18void loop() {19 // Read the values20 float temperature = bmp.readTemperature();21
22 // Print to the Serial Monitor23 Serial.print("Temperature: ");24 Serial.print(temperature);25 Serial.println(" C");26
27 Serial.println();28 delay(2000);29}I2C OLED
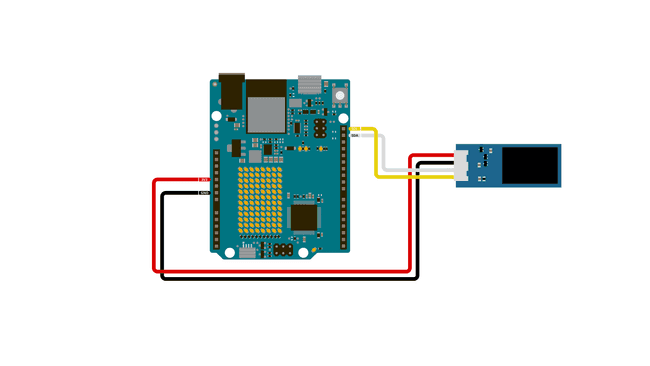
1#include <Wire.h>2#include <Adafruit_GFX.h>3#include <Adafruit_SSD1306.h>4
5Adafruit_SSD1306 display(128, 64, &Wire, -1);6
7// The Arduino Logo in a bitmap format8const uint8_t arduinoLogo[] = {9 0x00, 0x00, 0x00, 0x00, 0x00, 0x00, 0x00, 0x00, 0x00, 0x00, 0x00, 0x00, 0x00, 0x00, 0x00, 0x00,10 0x00, 0x00, 0x00, 0x00, 0x07, 0xf8, 0x00, 0x00, 0x00, 0x00, 0x1f, 0xe0, 0x00, 0x30, 0x00, 0x00,11 0x00, 0x00, 0x00, 0x00, 0x3f, 0xff, 0x00, 0x00, 0x00, 0x00, 0xff, 0xfc, 0x00, 0x70, 0x00, 0x00,12 0x00, 0x00, 0x00, 0x01, 0xff, 0xff, 0xe0, 0x00, 0x00, 0x07, 0xff, 0xff, 0x80, 0x50, 0x00, 0x00,13 0x00, 0x00, 0x00, 0x07, 0xff, 0xff, 0xf8, 0x00, 0x00, 0x1f, 0xff, 0xff, 0xe0, 0x40, 0x00, 0x00,14 0x00, 0x00, 0x00, 0x0f, 0xff, 0xff, 0xfe, 0x00, 0x00, 0x3f, 0xff, 0xff, 0xf0, 0x20, 0x00, 0x00,15 0x00, 0x00, 0x00, 0x3f, 0xff, 0xff, 0xff, 0x00, 0x00, 0xff, 0xff, 0xff, 0xfc, 0x00, 0x00, 0x00,16 0x00, 0x00, 0x00, 0x7f, 0xff, 0xff, 0xff, 0x80, 0x01, 0xff, 0xff, 0xff, 0xfe, 0x00, 0x00, 0x00,17 0x00, 0x00, 0x00, 0xff, 0xff, 0xff, 0xff, 0xc0, 0x03, 0xff, 0xff, 0xff, 0xff, 0x00, 0x00, 0x00,18 0x00, 0x00, 0x01, 0xff, 0xfc, 0x0f, 0xff, 0xe0, 0x07, 0xff, 0xf0, 0x3f, 0xff, 0x80, 0x00, 0x00,19 0x00, 0x00, 0x01, 0xff, 0xc0, 0x00, 0xff, 0xf0, 0x0f, 0xff, 0x00, 0x07, 0xff, 0x80, 0x00, 0x00,20 0x00, 0x00, 0x03, 0xff, 0x80, 0x00, 0x7f, 0xf8, 0x1f, 0xfc, 0x00, 0x01, 0xff, 0xc0, 0x00, 0x00,21 0x00, 0x00, 0x07, 0xfe, 0x00, 0x00, 0x1f, 0xfc, 0x3f, 0xf8, 0x00, 0x00, 0x7f, 0xe0, 0x00, 0x00,22 0x00, 0x00, 0x07, 0xfc, 0x00, 0x00, 0x0f, 0xfe, 0x7f, 0xf0, 0x00, 0x00, 0x3f, 0xe0, 0x00, 0x00,23 0x00, 0x00, 0x0f, 0xf8, 0x00, 0x00, 0x07, 0xff, 0x7f, 0xe0, 0x00, 0x00, 0x1f, 0xf0, 0x00, 0x00,24 0x00, 0x00, 0x0f, 0xf0, 0x00, 0x00, 0x03, 0xff, 0xff, 0xc0, 0x00, 0x00, 0x0f, 0xf0, 0x00, 0x00,25 0x00, 0x00, 0x0f, 0xf0, 0x00, 0x00, 0x01, 0xff, 0xff, 0x80, 0x0f, 0x00, 0x0f, 0xf8, 0x00, 0x00,26 0x00, 0x00, 0x1f, 0xe0, 0x00, 0x00, 0x00, 0xff, 0xff, 0x00, 0x0f, 0x80, 0x07, 0xf8, 0x00, 0x00,27 0x00, 0x00, 0x1f, 0xe0, 0x00, 0x00, 0x00, 0x7f, 0xfe, 0x00, 0x0f, 0x80, 0x07, 0xf8, 0x00, 0x00,28 0x00, 0x00, 0x1f, 0xe0, 0x00, 0x00, 0x00, 0x3f, 0xfc, 0x00, 0x0f, 0x80, 0x07, 0xf8, 0x00, 0x00,29 0x00, 0x00, 0x1f, 0xc0, 0x00, 0x00, 0x00, 0x3f, 0xfc, 0x00, 0x0f, 0x80, 0x03, 0xf8, 0x00, 0x00,30 0x00, 0x00, 0x1f, 0xc0, 0x1f, 0xff, 0x00, 0x1f, 0xf8, 0x00, 0xff, 0xf8, 0x03, 0xfc, 0x00, 0x00,31 0x00, 0x00, 0x1f, 0xc0, 0x3f, 0xff, 0x00, 0x1f, 0xf8, 0x00, 0xff, 0xf8, 0x03, 0xfc, 0x00, 0x00,32 0x00, 0x00, 0x1f, 0xc0, 0x3f, 0xff, 0x00, 0x1f, 0xf0, 0x00, 0xff, 0xf8, 0x03, 0xfc, 0x00, 0x00,33 0x00, 0x00, 0x1f, 0xc0, 0x1f, 0xff, 0x00, 0x1f, 0xf8, 0x00, 0xff, 0xf8, 0x03, 0xfc, 0x00, 0x00,34 0x00, 0x00, 0x1f, 0xc0, 0x00, 0x00, 0x00, 0x3f, 0xfc, 0x00, 0x0f, 0x80, 0x03, 0xf8, 0x00, 0x00,35 0x00, 0x00, 0x1f, 0xc0, 0x00, 0x00, 0x00, 0x3f, 0xfc, 0x00, 0x0f, 0x80, 0x07, 0xf8, 0x00, 0x00,36 0x00, 0x00, 0x1f, 0xe0, 0x00, 0x00, 0x00, 0x7f, 0xfe, 0x00, 0x0f, 0x80, 0x07, 0xf8, 0x00, 0x00,37 0x00, 0x00, 0x1f, 0xe0, 0x00, 0x00, 0x00, 0xff, 0xff, 0x00, 0x0f, 0x80, 0x07, 0xf8, 0x00, 0x00,38 0x00, 0x00, 0x1f, 0xf0, 0x00, 0x00, 0x01, 0xff, 0xff, 0x80, 0x0f, 0x00, 0x0f, 0xf8, 0x00, 0x00,39 0x00, 0x00, 0x0f, 0xf0, 0x00, 0x00, 0x03, 0xff, 0xff, 0x80, 0x00, 0x00, 0x0f, 0xf0, 0x00, 0x00,40 0x00, 0x00, 0x0f, 0xf8, 0x00, 0x00, 0x07, 0xff, 0xff, 0xc0, 0x00, 0x00, 0x1f, 0xf0, 0x00, 0x00,41 0x00, 0x00, 0x07, 0xfc, 0x00, 0x00, 0x0f, 0xfe, 0x7f, 0xf0, 0x00, 0x00, 0x3f, 0xe0, 0x00, 0x00,42 0x00, 0x00, 0x07, 0xfe, 0x00, 0x00, 0x1f, 0xfc, 0x3f, 0xf8, 0x00, 0x00, 0x7f, 0xe0, 0x00, 0x00,43 0x00, 0x00, 0x03, 0xff, 0x00, 0x00, 0x7f, 0xf8, 0x1f, 0xfc, 0x00, 0x00, 0xff, 0xc0, 0x00, 0x00,44 0x00, 0x00, 0x01, 0xff, 0xc0, 0x01, 0xff, 0xf0, 0x0f, 0xff, 0x00, 0x03, 0xff, 0x80, 0x00, 0x00,45 0x00, 0x00, 0x01, 0xff, 0xf8, 0x07, 0xff, 0xf0, 0x07, 0xff, 0xe0, 0x1f, 0xff, 0x80, 0x00, 0x00,46 0x00, 0x00, 0x00, 0xff, 0xff, 0xff, 0xff, 0xe0, 0x03, 0xff, 0xff, 0xff, 0xff, 0x00, 0x00, 0x00,47 0x00, 0x00, 0x00, 0x7f, 0xff, 0xff, 0xff, 0x80, 0x01, 0xff, 0xff, 0xff, 0xfe, 0x00, 0x00, 0x00,48 0x00, 0x00, 0x00, 0x3f, 0xff, 0xff, 0xff, 0x00, 0x00, 0xff, 0xff, 0xff, 0xfc, 0x00, 0x00, 0x00,49 0x00, 0x00, 0x00, 0x0f, 0xff, 0xff, 0xfe, 0x00, 0x00, 0x7f, 0xff, 0xff, 0xf0, 0x00, 0x00, 0x00,50 0x00, 0x00, 0x00, 0x07, 0xff, 0xff, 0xf8, 0x00, 0x00, 0x1f, 0xff, 0xff, 0xe0, 0x00, 0x00, 0x00,51 0x00, 0x00, 0x00, 0x01, 0xff, 0xff, 0xe0, 0x00, 0x00, 0x07, 0xff, 0xff, 0x80, 0x00, 0x00, 0x00,52 0x00, 0x00, 0x00, 0x00, 0x7f, 0xff, 0x80, 0x00, 0x00, 0x01, 0xff, 0xfc, 0x00, 0x00, 0x00, 0x00,53 0x00, 0x00, 0x00, 0x00, 0x07, 0xf8, 0x00, 0x00, 0x00, 0x00, 0x1f, 0xc0, 0x00, 0x00, 0x00, 0x00,54 0x00, 0x00, 0x00, 0x00, 0x00, 0x00, 0x00, 0x00, 0x00, 0x00, 0x00, 0x00, 0x00, 0x00, 0x00, 0x00,55 0x00, 0x00, 0x00, 0x00, 0x00, 0x00, 0x00, 0x00, 0x00, 0x00, 0x00, 0x00, 0x00, 0x00, 0x00, 0x00,56 0x00, 0x00, 0x00, 0x00, 0x00, 0x00, 0x00, 0x00, 0x00, 0x00, 0x00, 0x00, 0x00, 0x00, 0x00, 0x00,57 0x00, 0x00, 0x00, 0x00, 0x00, 0x00, 0x00, 0x00, 0x00, 0x00, 0x00, 0x00, 0x00, 0x00, 0x00, 0x00,58 0x00, 0x00, 0x00, 0x0c, 0x07, 0x80, 0xf0, 0x04, 0x18, 0xff, 0x88, 0x18, 0x1c, 0x00, 0x00, 0x00,59 0x00, 0x00, 0x00, 0x1e, 0x0f, 0xf8, 0xff, 0x1e, 0x1c, 0xff, 0x9e, 0x1c, 0x7f, 0x00, 0x00, 0x00,60 0x00, 0x00, 0x00, 0x1f, 0x0f, 0xfc, 0xff, 0x9e, 0x1c, 0xff, 0x9f, 0x1c, 0xff, 0x80, 0x00, 0x00,61 0x00, 0x00, 0x00, 0x3f, 0x0e, 0x3c, 0xe3, 0xce, 0x1c, 0x1c, 0x1f, 0x1d, 0xe3, 0x80, 0x00, 0x00,62 0x00, 0x00, 0x00, 0x3f, 0x0e, 0x1c, 0xe1, 0xce, 0x1c, 0x1c, 0x1f, 0x99, 0xc3, 0x80, 0x00, 0x00,63 0x00, 0x00, 0x00, 0x33, 0x8e, 0x1c, 0xe1, 0xce, 0x1c, 0x1c, 0x1f, 0x99, 0xc3, 0xc0, 0x00, 0x00,64 0x00, 0x00, 0x00, 0x73, 0x8f, 0x3c, 0xe1, 0xce, 0x1c, 0x1c, 0x1d, 0xd9, 0xc3, 0xc0, 0x00, 0x00,65 0x00, 0x00, 0x00, 0x73, 0x8f, 0xf8, 0xe1, 0xce, 0x1c, 0x1c, 0x1d, 0xf9, 0xc3, 0xc0, 0x00, 0x00,66 0x00, 0x00, 0x00, 0x7f, 0x8f, 0xf0, 0xe1, 0xce, 0x1c, 0x1c, 0x1c, 0xf9, 0xc3, 0x80, 0x00, 0x00,67 0x00, 0x00, 0x00, 0xff, 0xce, 0x70, 0xe3, 0xce, 0x1c, 0x1c, 0x1c, 0xf9, 0xc3, 0x80, 0x00, 0x00,68 0x00, 0x00, 0x00, 0xff, 0xce, 0x78, 0xe7, 0x8e, 0x3c, 0x3c, 0x1c, 0x7d, 0xe7, 0x80, 0x00, 0x00,69 0x00, 0x00, 0x00, 0xe1, 0xce, 0x3c, 0xff, 0x8f, 0xf8, 0xff, 0x9c, 0x7c, 0xff, 0x00, 0x00, 0x00,70 0x00, 0x00, 0x01, 0xe1, 0xee, 0x3c, 0xff, 0x07, 0xf0, 0xff, 0x9c, 0x3c, 0x7e, 0x00, 0x00, 0x00,71 0x00, 0x00, 0x00, 0x00, 0x00, 0x00, 0x00, 0x01, 0xc0, 0x00, 0x00, 0x00, 0x18, 0x00, 0x00, 0x00,72 0x00, 0x00, 0x00, 0x00, 0x00, 0x00, 0x00, 0x00, 0x00, 0x00, 0x00, 0x00, 0x00, 0x00, 0x00, 0x00,73};74
75void setup() {76 Serial.begin(9600);77
78 if(!display.begin(SSD1306_SWITCHCAPVCC, 0x3C)) {79 Serial.println(F("SSD1306 not found"));80 while(1){}81 }82
83 display.clearDisplay();84
85 display.drawBitmap(0, 0, arduinoLogo, 128, 64, SSD1306_WHITE);86 display.display();87
88}89
90void loop() {91}Suggest changes
The content on docs.arduino.cc is facilitated through a public GitHub repository. If you see anything wrong, you can edit this page here.
License
The Arduino documentation is licensed under the Creative Commons Attribution-Share Alike 4.0 license.