Device to Device
Learn how to connect two boards through the Arduino Cloud, by syncing their variables.
Introduction
In this tutorial, we will find out how to send data between two Arduino boards, using the Arduino Cloud. Each board will have one LED and one button each that will be used to send data between the boards.
This will be made possible through something called syncing variables, which will be explained further in this tutorial.
Goals
The goals of this project are:
- Set up the Arduino Cloud.
- Create synchronized variables.
- Control an LED remotely with a push button.
Hardware & Software needed
- Arduino Cloud.
- 2x Arduino MKR WiFi 1010 or,
- 2x Arduino MKR WiFi 1000 or,
- 2x Arduino Nano 33 IoT or,
- 2x Arduino Nano RP2040 Connect.
- Micro USB cable.
Note: It is not required to have two devices of the same type. You can for example use a Nano RP2040 Connect and a MKR WiFi 1010. Any Arduino Cloud enabled Wi-Fi board will work with this tutorial.
We will also need the following components for the circuit:
- 2x generic LEDs.
- 2x pushbuttons.
- 2x 220 ohm resistors.
- Jumper wires.
- Breadboard.
Circuit
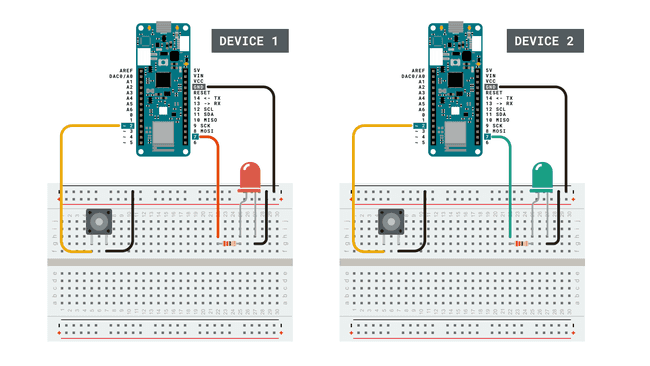
Follow the circuit below to connect the buttons and LEDs to your Arduino board.
Note that the pinouts are different on a Nano board. The circuit below is for a MKR WiFi 1000/1010 board.
Setting up the Arduino Cloud
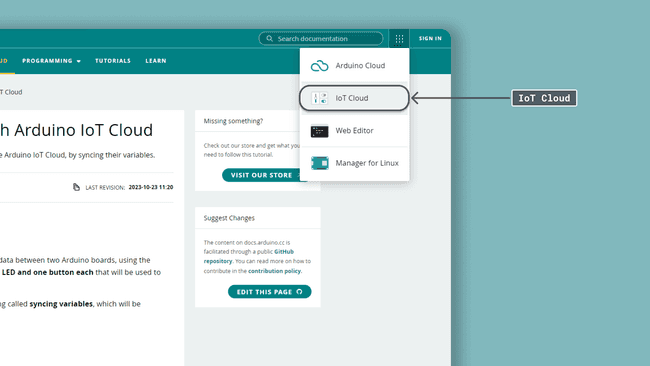
To start, we will need to head over to the Arduino Cloud. This is also accessible through the menu at the top right.
Step 1: Configuring two devices
In this tutorial, we will need to set up two devices in the Arduino Cloud. If you have never used this service before, you can check out our getting started with the Arduino Cloud guide.
Now that we are working with two devices, it is important to separate them from each other, since they will later be linked to two different Things. In this tutorial, we named the devices:
- Device_1
- Device_2
It is a good idea to place a label on the physical board to remember which one is which as well!
Step 2: Creating the first Thing
Let's start by creating a new Thing, for simplicity, let's name it Remote Light One.
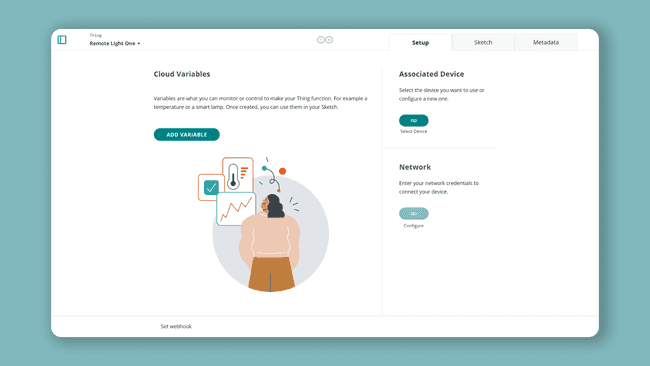
Now, we will need to add two variables, with the following settings:
| Variable Name | Data Type | Permission |
|---|---|---|
| switch_1 | boolean | read & write |
| switch_2 | boolean | read & write |
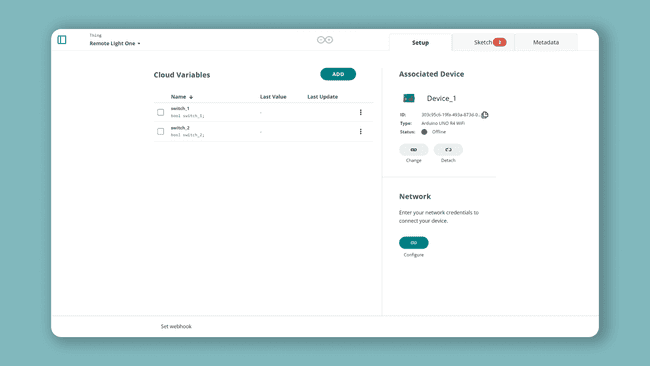
We also need to enter our network details, and select our device (which should be Device_1).
The final overview should look something like this:
Step 3: Program the first Thing
Now, we also need to complete the sketch for our first Thing. First, let's head over to the "Sketch" tab in the Arduino Cloud.
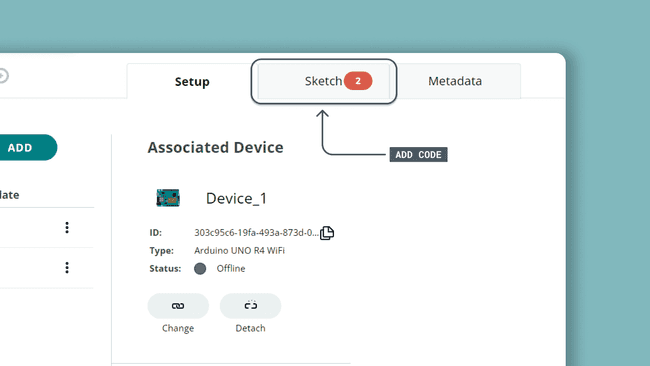
The code that is needed can be found in the snippet below. Upload the sketch to the first board.
Step 4: Complete code for Device_1
1#include "thingProperties.h"2
3int buttonPin = 2;4int ledPin = 7;5
6void setup() {7 // Initialize serial and wait for port to open:8 pinMode(buttonPin, INPUT_PULLUP);9 pinMode(ledPin, OUTPUT);10 11 // Initialize serial and wait for port to open:12 Serial.begin(9600);13 // This delay gives the chance to wait for a Serial Monitor without blocking if none is found14 delay(1500); 15
16 // Defined in thingProperties.h17 initProperties();18
19 // Connect to Arduino Cloud20 ArduinoCloud.begin(ArduinoIoTPreferredConnection);21 22 /*23 The following function allows you to obtain more information24 related to the state of network and Arduino Cloud connection and errors25 the higher number the more granular information you’ll get.26 The default is 0 (only errors).27 Maximum is 428 */29 setDebugMessageLevel(2);30 ArduinoCloud.printDebugInfo();31}32
33void loop() {34 ArduinoCloud.update();35 // Your code here 36 37 int buttonState = digitalRead(buttonPin);38 39 if(buttonState == LOW) {40 switch_1 = !switch_1;41 delay(500);42 }43 44}45
46void onSwitch2Change() {47 // Do something48 49}50
51void onSwitch1Change() {52 // Do something53 if(switch_2) {54 digitalWrite(ledPin, HIGH);55 }56 else{57 digitalWrite(ledPin, LOW);58 }59}Step 5: Creating the second Thing
After we have successfully uploaded the code to our first board, we can go on to create our second Thing.
To create our second Thing, we need to click on the "Things" tab, and click on "Create Thing". We can name this one Remote Light Two.
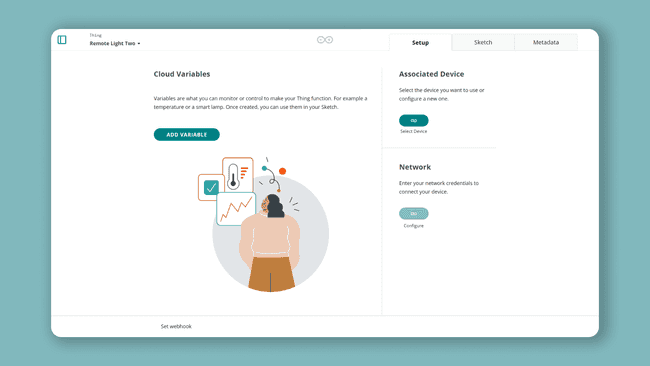
Now, we need to create the variables we want to sync with the other Thing. First, click on the "Add Variable" button. We will name this one switch_1 as well, and then click on the "Sync with other things" option.
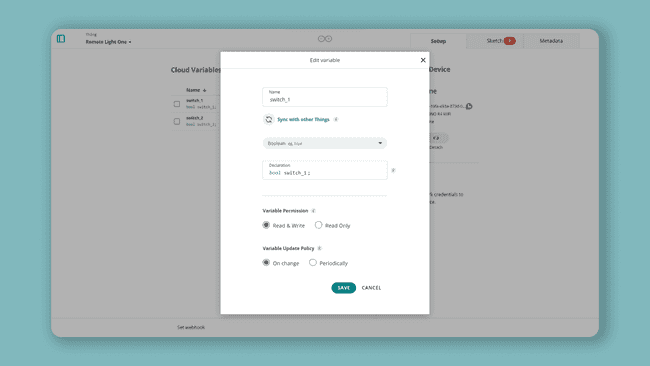
We will now see the two variables we created inside Remote Light One. Let's select the switch_1 variable and click on "Synchronize variables" and finally click on Add Variable.
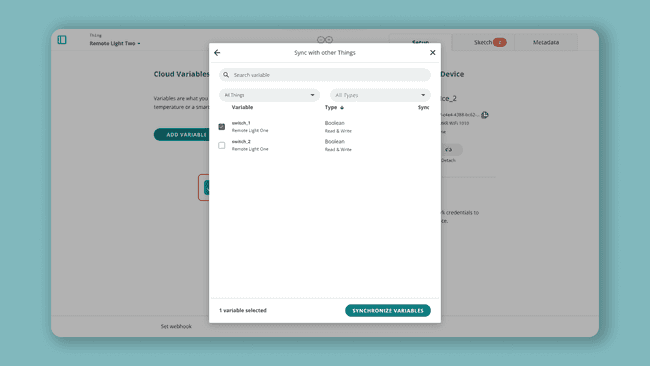
Next, we can repeat the same process for the boolean variable, but instead of selecting the switch_2 variable to sync with, select the boolean_sync variable. Now we should have two variables that are synced with our other Thing.
Here we will also need to enter our network details, and select our device (which should be Device_2).
Step 6: Program the second Thing
Now we will need to edit the sketch for our second Thing. This sketch is almost identical to the previous sketch we made, but the only difference is that we switched places on the boolean variables.
This means that whenever the button is pressed,
switch_2switch_1The code that is needed can be found in the snippet below. Upload the sketch to the board.
Note: Make sure that you upload this sketch to Device_2, as we have already uploaded the first sketch to Device_1.
Step 7: Complete for Device_2
1#include "thingProperties.h"2
3int buttonPin = 2;4int ledPin = 7;5
6void setup() {7 // Initialize serial and wait for port to open:8 pinMode(buttonPin, INPUT_PULLUP);9 pinMode(ledPin, OUTPUT);10 11 // Initialize serial and wait for port to open:12 Serial.begin(9600);13 // This delay gives the chance to wait for a Serial Monitor without blocking if none is found14 delay(1500); 15
16 // Defined in thingProperties.h17 initProperties();18
19 // Connect to Arduino Cloud20 ArduinoCloud.begin(ArduinoIoTPreferredConnection);21 22 /*23 The following function allows you to obtain more information24 related to the state of network and Arduino Cloud connection and errors25 the higher number the more granular information you’ll get.26 The default is 0 (only errors).27 Maximum is 428 */29 setDebugMessageLevel(2);30 ArduinoCloud.printDebugInfo();31}32
33void loop() {34 ArduinoCloud.update();35 // Your code here 36 37 int buttonState = digitalRead(buttonPin);38 39 if(buttonState == LOW) {40 switch_2 = !switch_2;41 delay(500);42 }43 44 45}46
47void onSwitch2Change() {48 // Do something49 50}51
52void onSwitch1Change() {53 // Do something54 if(switch_1) {55 digitalWrite(ledPin, HIGH);56 }57 else{58 digitalWrite(ledPin, LOW);59 }60}Testing it out
After we have successfully uploaded the code to our second Thing, we have completed all the configurations needed for the two boards to communicate.
Just to re-cap here's what we have done so far:
- Configured two devices.
- Created two Things.
- Created two variables,
andswitch_1
.switch_2 - Synced the variables between the Things.
- Uploaded the sketches to Device_1 and Device_2.
If everything is working properly, and the circuit is wired correctly, we should be able to control both LEDs on each board, by pressing the button on the opposite board.
- The button on Device_1 will control the LED on Device_2.
- The button on Device_2 will control the LED on Device_1.
- The logic is set to turn ON and OFF the LED with the same button.
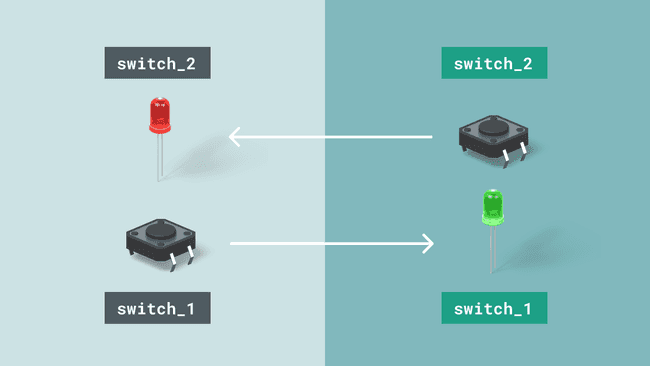
The logic behind it is that one button is each linked to one of the booleans. If for example,
switch_2falseswitch_1true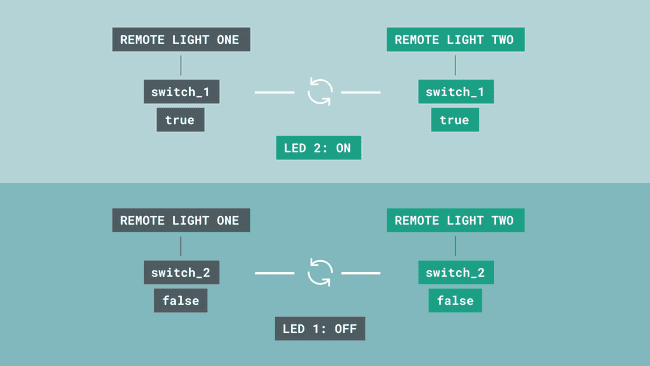
Troubleshooting
- Have you uploaded the sketches correctly? Remember that you need to upload the sketch for Remote Light One to Device_1 and Remote Light Two to Device_2.
- Have you entered the network details correctly? After you have uploaded the sketch, open the Serial Monitor to see if there is any errors with your connection.
- Have you configured the devices properly? It can sometimes be confusing to which board is which, sometimes it helps to re-configure and re-upload the sketches!
Conclusion
In this tutorial, we created a connection between two Arduino boards, using the Arduino Cloud. We set up two identical circuits, and uploaded two almost identical sketches to the boards.
The connection between the boards is made through the syncing of variables, which allows two Things to communicate with each other. In this case, whenever a boolean is activated on one device, it is also activated on the other device. This remote ON/OFF switch is a great building block for creating other cool IoT projects.
More tutorials
You can find more tutorials in the Arduino Cloud documentation page.
Suggest changes
The content on docs.arduino.cc is facilitated through a public GitHub repository. If you see anything wrong, you can edit this page here.
License
The Arduino documentation is licensed under the Creative Commons Attribution-Share Alike 4.0 license.